Replacement Anti-Virus Installed

I originally used Norton Anti-Virus across 5 PC’s in the house but the annual renewal costs were getting a bit silly, especially as I want to buy radio stuff so savings have to be made!

The family bank with Barclays and they offer each account holder FREE Kaspersky Anti-Virus software with two PC licences, I have downloaded the program and linked the accounts to a centralized web based dashboard and everything is working just fine, as I have three PCs including the weather PC, it costs an additional £9.95 for 5 PC licensing which is a great offer in my view, (I did try the free AVG Anti-Virus program but was plagued with ‘buy now’ and ‘upgrade’ messages).

Kaspersky Total Security is free if you bank with Barclays, the link is at the bottom of your online banking page.

Added Daily Records Page

Added a new Daily Records page to Chatteris Weather, this compares previous daily records to current, this information is all on one page per month, it is quite interesting to see what the readings were then and now.

A drop down month selector is at the top of the web page with records going back to December 2013, the page can be accessed via the Daily Records link above or from the Chatteris home page, ‘Almanac’ on the menu bar and select ‘Daily Records’.

Mag Loop Vacuum Capacitor

The mag loop build project is getting nearer, I have the MFJ antenna analyzer, the control method is being worked through and the grooved rollers have been made so I can bend the copper pipe into a loop, the most expensive item required for the loop to work effectively is the tuning capacitor.

SAM_5285 (Medium)

Details:-
Russian (Soviet) Vacuum Variable Capacitor KP1-12, 10-1200 pF, 4 kV, 50 A, 30 MHz.
Main technical data:
Min. capacity – 10 pF (+/- 10%).
Max. capacity – 1200 pF (+/- 5%).
Nominal operating voltage – 4 kV.
Nominal HF current – 50A.
Frequency range – up to 30 MHz.
Glass body temperature range – up to 140 o F.
Height – 7.87 in. (~200 mm)
Diameter – 3.54 in (~90 mm).
Weight – 3.31 lb. (~1.6 kg.)

The build quality is excellent, with the turning action being very smooth and returning to the home position easily once holding torque has been removed, I haven’t yet tested that the tube is still under vacuum, I will do this further down the project, the method involves putting the capacitor in the fridge for a while, when the capacitor is removed, if condensation is observed within the glass envelope, you know the tube seal has failed, the other more obvious sign is that the copper plates will oxidize and lose the bright and shiny appearance.

This was bought from Ebay at a cost of £103.20 (vendor to my best price offer saving £26) after a lot of research as I wanted the capacitor to have the widest range so as not to limit me too much on the loop sizes and hence the frequencies of interest I may wish to make in the future, station power output was a consideration which influences the Kv operating voltage rating of the capacitor, however, I will tailor the output power to keep below the operating voltage when needed especially as I do not want to buy another one!
The postage was £36.62 which I thought was a bit expensive, however, I have never seen such comprehensive packaging to protect an item and this all adds to the weight, so overall, I’m happy and feel I have value for money.

Arduino Uno

As a licensed listener 🙂 one of the aspects which drew me to radio as a hobby was the huge variety of paths it can take you down, I would like to construct a Mag Loop antenna, Peter M0DCV gave a really interesting and informative talk and demonstration at a club evening, not only was their the construction element which attracted me, but how the loop was controlled and tuned.

Looking on the internet and YouTube shows plenty of mag loops being controlled via an Arduino, this is completely new to me so the best place for me to start was to get a starter kit off Ebay, the kit cost £31 and is an Arduino clone (Sintron) and contains everything to play with, (Servos, leds, LCD displays etc) well everything apart from an instruction book, fortunately after the purchase, the vendor sends you a link to download a whole host of manuals and projects.

I was up and running within about 10 minutes with the first project which was to make the on board led flash, the next project was the make traffic lights following the UK convention and this setup is in the picture, this slowly slowly approach is good for me as I’m learning how the code works and what are the effects when you make changes.

The ultimate aim is to download a program which will control a motor connected to the tuning control on a mag loop.

SAM_5281 (Medium)

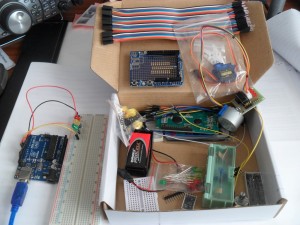
Note – The ribbon patch connectors in the picture was bought separately, again from Ebay for £0.99p including free postage!

I have ordered a larger motor, motor interface and rotary enumerator, once configured, the motor will mimic the turns of the manual rotary control. I will post up more when it arrives.

Heathkit GD-1U GDO

Been to a few radio rallies and at the CDARC surplus sale on the 13 February I recently bought a Heathkit GD-1U Grid Dip Oscillator complete with the original coils, a bargain at £10.

SAM_5282 (Medium)

Thanks to Andy (G6OHM) for sending me the link to the service manual and David (M0ZEB) for the Assembly and User Guide.

GDO_Heath_GD-1U_schematic

GD-1U-GPO Assembly and User Guide (7.3Mb File).

GD-1A-GDO Assembly & User Guide.

MFJ 269C Pro Analyser

I realised fairly early on that I would need some form of antenna analyser if I was to build my own, the decision was then which one and how much to spend!

mfj269c

I opted to buy the MFJ260C Pro – Link to Manual as this has all the frequency ranges that I will need and a number of very useful, added value features, such as:
Coax Loss measurement
Cable Length
Length (distance) to open or short circuit
Capacitance in pico Farads
Inductance in micro Henries
Frequency Counter

The money to help pay for this came from not having to pay two months of council taxes, I ordered the unit from Ham Radio Outlet, New Hampshire, USA, their was a January promotion of a $50 reduction which eased the pain a bit!

The meter took 4 days to reach the Parcel Force Cambridge depot where it sat until I paid £64 release fee (£54 VAT and £8 handing fee), it would have been nice if I didn’t have to pay this, but I knew when I ordered it that it was a real possibility, nevertheless, I saved over £71.00!

Well I didn’t actually save £71 as the unit needs batteries to be portable, I bought rechargeable ones as I didn’t want to keep opening the case to remove batteries when not in use, also this allows me to regularly keep the batteries charged in-situ, the downside was that these cost nearly £30 – (10 AA 2000mAH batteries bought in packs of 4 from Argos).

I’ll give another write-up once I know how to turn it on 🙂

Noise Cancelling Speaker

After reading reviews and watching YouTube videos, I decided to buy a BHI noise cancelling speaker from Radioworld ltd – Link to Information.
I opted for this version as it has a small footprint and is very adaptable, for example if I choose to put a rig in a vehicle, transferring it is a very simple matter of unplugging the audio 3.5mm jack from the transceiver and 12v power lead, the other plus was that it has a 3.5mm mono headphone jack which cuts the speaker when plugged in, meaning the feed to the headphones benefits from the noise cancelling. (see warning)

NES10-2-MK3_2c54ce28c0a1105603d6ff099dbb7676

The unit works really well and reduces interference and in some cases completely eliminates it enabling me to hear stations which I couldn’t otherwise.

The speaker has a number of controls:

Power Off/ Audio Bypass, with this ON the unit is a powered amplifier with the volume being adjusted but a control on the top of the speaker (Note – as a powered speaker it is susceptible to picking up the polling of any mobile phones near to the unit which can be very annoying), with the power on, but the noise cancellation OFF, a RED led will be lit on the front of the unit.

Turning noise cancellation ON is done by a slide switch on the top of the unit, the LED will change to green when in this mode, a multi-position rotary switch on the rear of the unit adjusts the level of filtering, you know when you have too much noise cancellation as the speech sounds like they are underwater!

I’m very pleased with the unit and it works well, two things I have found is that the filtering initially introduces latency during tuning until the noise cancelling stabilizes, this only takes a few moments but gives the impression that you are not on frequency with the tendency therefore to tune past the spot frequency in use, the other issue is that any roger bleep, radio confirmation or CW tone is not caught by the noise cancelling circuit and will break through the unit at an Warning – incredibly loud volume, be aware of this if you are wearing headphones (as I found out!!).