
Updated 23 February 2023
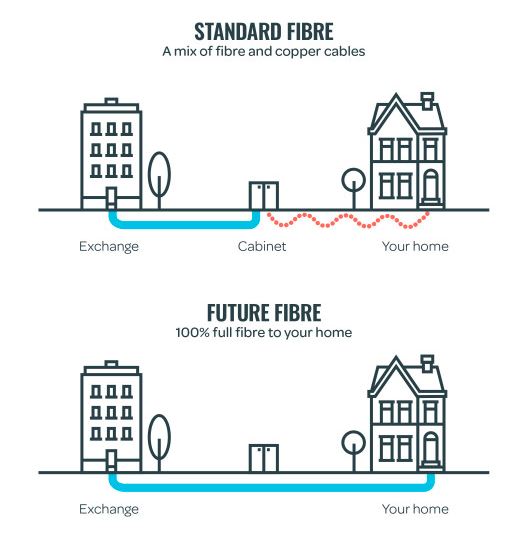
This blog is to document the process, equipment, installation and performance of TalkTalk’s Future Fibre 65 Fibre to the Premises (FTTP) and not to be confused with Fibre 65 which is a Fibre to the Cabinet and then a copper cable to your home.
FAQ
- What size is the Customer Service/Splice Point (CSP)
- H:166mm W: 144mm D: 33mm
- What size is the Optical Network Terminal (ONT)
- H:90mm W:82mm
- How near does the power socket need to be to the ONT
- 1m
- Typical distance from external CSP to ONT
- 10m
- What diameter is the Customer Lead Outside/In Cable
- The cable is 5mm diameter, best to drill a 10mm hole to avoid any damage
- Customer Lead Outside/In Cable kit diameter hole needed
- 12mm
- What is the minimum bending radius of the Lead Outside/In Cable
- the radius of a £2 coin is the minimum bend
- What is the physical size of the Sagemcon FAST 5364-3. TB/AV3/C1
- 260mm Width, 170mm Height & 60mm Thickness compared to the Huawei HG633 – 200mm Width, 130mm Height & 30mm Thickness.
Timeline of installation:
- 4th December 2021, TalkTalk cold called and said I was eligible for an upgrade to FTTP, after sleeping on it, I called them back the next day.
- 5th December 2021, Ordered TalkTalk Future Fibre 65 FTTP after confirming the details and a provisional installation date of 4th January 2022 was given. A pre-installation survey will need to be undertaken and I will be contacted regarding this.
- 14th December 2021, Rang TalkTalk Future Fibre team on 0345 172 5221 to check that a new router will be sent out as my existing router does not have a WAN port, they confirmed a new one would arrive a week before the installation date.
- 21st December 2021, Text from Openreach confirming installation appointment on the 4th January 2022 between 8am – 1pm. As a side note, I have since ordering FTTP from TalkTalk on the 5th, received 3 separate calls from TalkTalk sales asking me about upgrading to FTTP!!
- 23rd December 2021, email from Yodel letting me know the TalkTalk router will be delivered on the 30th December.
- 28th December 2021, Text from Openreach confirming installation appointment, the text also includes a link to an Openreach Fibre Checklist.
- 29th December 2021, Yodel delivery of TalkTalk Wi-Fi Hub (Sagemcom Fast 5364)
- 30th December 2021, Swopped my existing TalkTalk HG633 router with the new Sagemcon router and added device Port Forwarding rules for my CCTV and games console.
- 4th January 2022, Openreach knock on the door at 8:30, and all done by 11:30, very pleased 🙂
- 5th January 2022, Checked my TalkTalk account which has not yet been updated, however, Openreaches online availability checker has been.
- 8th February 2022, TalkTalk account not updated to show I’m on Future Fibre 65, but it does show I have a bill for £0.45p to pay, ironically TalkTalk upgrade team called again (third time!) regarding FTTP , also I received an email for customer experience on Future Fibre, so at least someone knows I have it :-).
- 26th February 2022, Not a clue how they have worked the bill out, my account still shows my original package but they have made adjustments so that I pay the agreed amount, not ideal but as long as it works I’m happy.
1st August 2022, Replacement Sagemcom Router (FAST 5464 -2.T4) sent out as my original router could not be seen on my account dashboard or at TalkTalk Tech support:
Unfortunately, as of a few hours in, it is still the same 🙁
This router is an improvement on the one it replaces as I have a future connection on the rear for VOIP:
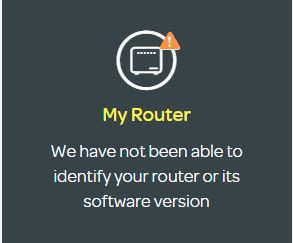
2nd August 2022, Spoke to TalkTalk tech support and they can see the router and logs, so I’m ignoring the error message on my system status dashboard.
20th February 2023, My existing contract was coming to an end in March, contacting TalkTalk I upgraded to 150Mbps for £23pm/18m contract.
22nd February 2023, eero 6 mesh router arrived via Yodel.
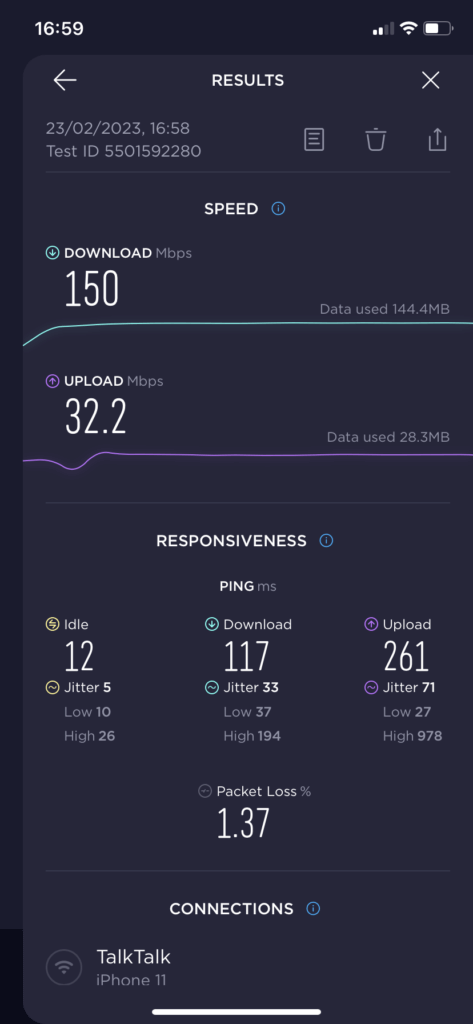
23rd February 2023, Service speed increased from 75Mbps to 150Mbs:
Background
I have previously blogged on the installation of Virgin Media to my home and this can be found HERE, unfortunately Virgin Media did not match up to their performance promise and I therefore cancelled within the cooling off period, and I stayed with the TalkTalk FTTC service, which is a copper pair from the house the a roadside cabinet (Fibre to the Cabinet), to add to the confusion, this is referred to as ‘Standard Fibre’ in the diagram below.
My existing FTTC service delivers a download speed of 60Mbps and Upload of 17Mbps which is more than adequate for my needs.

the other benefit of a copper cable service is that I retain a land line phone, although the only calls I receive are from scumbag spammers :-(.
Future Fibre
Openreach Roll Out Map which misses out Chatteris but has been done, go figure! – LINK
1st July 2021, BT Openreach started installing the fibre infrastructure to support full fibre broadband in my road, TalkTalk have named this ‘Future ‘Fibre’ and is the differentiation between the FTTC & FTTP fibre services.

Moving forward five months to 4th December 2021, TalkTalk got in touch with an upgrade offer to FTTP which was a surprise as I mistakenly thought the Openreach Full-Fibre Broadband was only open to BT customers (Openreach’s Full Fibre network is open access – ISP choice is BT, Sky, TalkTalk, Vodafone, EE, Zen, Andrews and Arnold, Aquiss, Cerberus, Fibre Net, Giganet, Orbital Net, Pine Media, Spectrum, Structured, Syscomm and Uno and growing).
Based on what I was told (and recorded) during my follow-up call back to TalkTalk on the 5th December, I accepted the offer of Future Fibre 65 for £23.50 for an 18 month contract, this also includes retaining my landline and Youview box.
The average TalkTalk download speed on Fibre 65 is 67Mbps and the average upload speed is 18Mbps.
Openreach FTTP Network
Infrastructure
I like to gather and be informed as much as possible on the technology and installation methods for this new service into my property.
I have an aversion to cables being on show, so if I can gain an understand of the end to end process, I may be able to do enabling works which will not only make the installation easier for the engineer, but will meet my needs for equipment location and neatness.

The above schematic shows the Openreach FTTP infrastructure which TalkTalk will carry my fibre broadband service, I was assured that my copper cable wired landline will still work, (I do know that all BT copper phones will cease by 2025), so if it does stop before that, I will go over to VOIP using Sipgate.
To check on what BT know about my existing service I used the Broadband Availability Checker, this gave the information below:
I used this LINK to check if the Full-Fibre service was available to me.
My house was built circa 2002/3 and the developer installed a dedicated BT duct from the house to a pavement manhole where the connections are made.
In the broadband checker document, the duct is identified as being a Type 56 with a dimension of 2.5″, so, as long as the duct hasn’t collapsed or is blocked, getting a Customer Lead In new fibre cable to the house should be fairly easy.
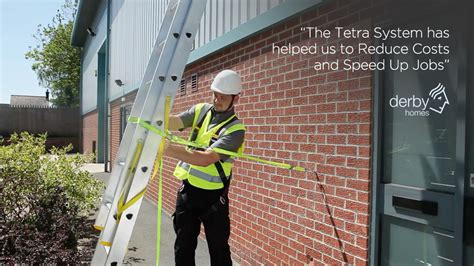
For Information :If you have an overhead telephone service, a 12.5mm ladder securing point hole/s will need to be drilled in the wall, following the Tetra Ladder Safety System.
Documentation
At the House
My understanding is that the Customer Lead In cable is a pre- terminated cable which is plugged into either a pole or chamber mounted CBT (connectorised block terminal), the unterminated end is the one which is outside your house for termination to the customers Lead Out/In Cable.

The above picture shows a Customer Service Point this is also can be known as a Customer Splice Point where the Customer Lead In fibre cable is spliced to the Lead Inside/Out cable which passes through the wall using a Cable Lead In Protector Kit to connect to the Optical Network Terminal (or Optical Network Termination Point).

From the wall mounted ONT, an Ethernet cable cable plugs into a modem, the ONT needs power which should be within 1m of a socket.
If the ONT does need relocating, a DIY kit is available from HERE.
My Installation – Pre Works
The phoneline to my house comes via an underground duct to an external junction box which connects to the internal house phone wiring which was installed when the house was built.

I wanted the neatest possible installation with the ONT going upstairs, so I decided to buy EZbend fibre optic cable, install conduit and get everything ready for the engineer to (hopefully) terminate and test.
I ran 20mm heavy duty PVC conduit from where the BT duct surfaces round to the side gable wall observing Openreach guidance document regarding minimum bending radiuses and avoiding any sharp bends:


I used a 16mm flexible conduit to get from the ground floor to the loft, this gave plenty of room for the fibre cable and a spare draw cord should it be needed in the future.

The best location for the ONT was in a small room which houses my IT cabinet.
EZbend fibre (20m) was bought off eBay for £13 and is surplus from a builders home developers kit, I could have waited for Openreach to arrive rather than buying the fibre, but I thought it prudent to install it, if all goes well, Openreach will connect it, if not, I will use my fibre to pull theirs in, not really a big deal.

With the fibre all pulled in, slack was taken up in the loft.


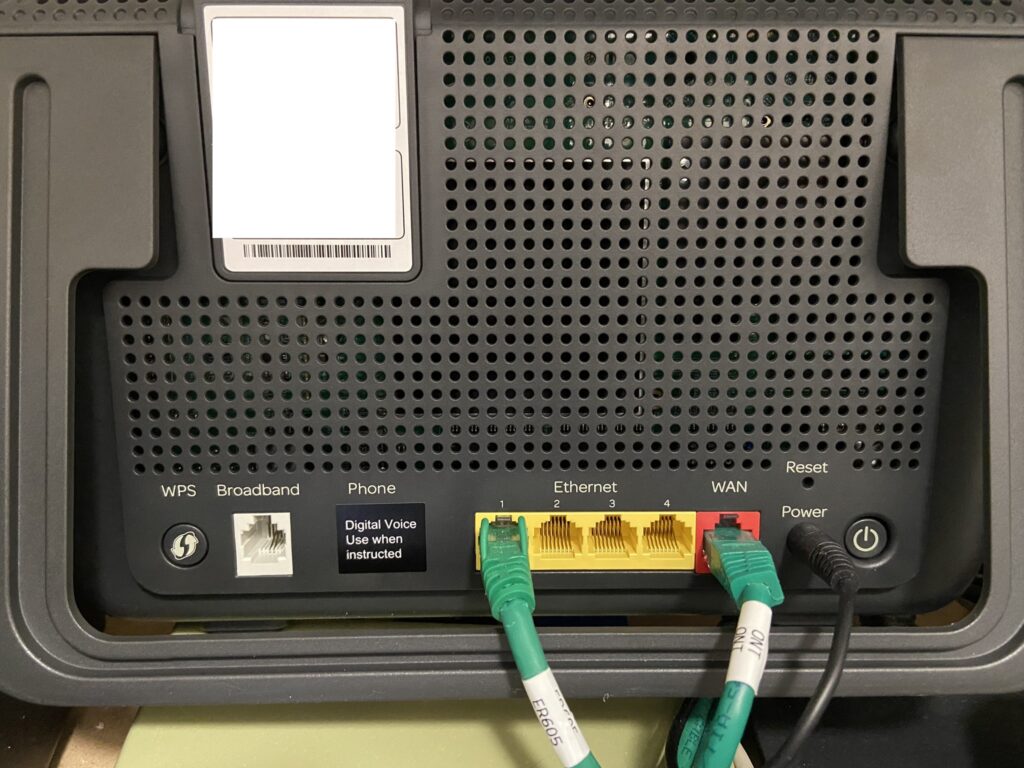
The above picture shows the fibre emerging from conduit, also their is a green Cat6 cable which will go from the ONT to the WAN port of the Router, also their is a low voltage extension to supply the ONT from within the IT Cabinet as this is UPS backed up.

Brushed outlet with the required connectors all ready for the ONT installation.

Router WAN, LAN and power connections all ready.


New router LAN cable ready for connection to the ER605 gateway.
I have left 2 meters of fibre ready for the engineer to connect to in the Customers Service Point (CSP), I have measured the space needed by the CSP and its going to be a snug fit.

Future Fibre Installation Day
Not sure what happened to texting before the appointment or an initial visit first, but it didn’t matter, knock on the door at 8:30 on the 4th Jan by Andy from Openreach to install and commission my Full Fibre broadband.
His first job was to rod from my house, through the existing duct to the JBF104 (Joint Box Footway – Type 104) which was approximately 50 meters away and contains the 12 port Connectorised Block Terminal (CBT).

It was during the pushing of the rod that Mark joined Andy for the installation.

Once the rod was in the JBF104, the pre connectorised customer lead-in cable was attached to the rod and drawn back to the house.

The pre terminated lead-in connector is simply coupled to an allocated port on the CBT, in my case port 1.

At the house end, a customers slice point (CSP) was mounted on the wall, ready to accept the incoming fibre from the CBT.

The lead-in cable was striped ready for splicing, the next job was to install the internal Nokia Optical Network Terminal.

All did not go exactly as planned here, I had originally ran in some EZBend fibre from the CSP to the ONT location, it turned out that fibre tools that are issued for stripping lead-in/lead-out cables, were not compatible with EZBend fibre outer sheath as the fibre did not have a rip cord to aid sheath removal, consequentially, it was decided to use the EZBend fibre as a draw, and pull in a Openreach supplied fibre optic cable which was my fall-back plan anyway.

Drawing in the new fibre using the draw fibre only took a short time as the cable was ran in containment making the installation very easy, plus of course, many hands making light work.

Once the new fibre from the ONT was at the CSP, Andy and Mark started working on the fusion splicing of the two fibres.

Once the splice was completed and the cable neatly stowed in the CSP enclosure, the ONT status lights were checked for service, a speed check was undertaken and Andy explained what the status lights on the ONT meant.

| Light | State | What it means |
|---|---|---|
| Power | On | The ONT has power |
| Power | Off | There is no power to the ONT. Check the power cable is properly in (the left-hand most one) and that the mains connection on the other end is switched on. |
| LOS | Off | You have a working fibre connection |
| LOS | On | You have a fibre connection issue – check the fibre connection in the bottom of the ONT. |
| PON | Off | No network connection has been made. |
| PON | On | You have a working network connection. |
| PON | Flashing | The ONT is negotiating a connection on the network. You’ll find this might happen a few times after initial installation. |
| LAN | Off | There is no data transmitter to your router – check the LAN cable! |
| LAN | Flashing | The shows that data is transmitting successfully to your router |
So, a full working connection should look like this…
| Light | State |
|---|---|
| Power | On solidly |
| LOS | Off |
| PON | On solidly |
| LAN | Flashing |
Openreach recommend fast.com as a speed checker, my preferred one is speedtest.net.
My package with TalkTalk is Future Fibre 65, so I’m very pleased with my speeds:


The last job was to put capping over the cables to the CSP making the installation look very neat.

Job complete, the guys left at 11:30, so the installation took 3 hours.
I was very impressed with the Openreach engineers, nothing was too much trouble for them and they were respectful of my property, removing boots before coming in etc.
The whole process (to date) has been hassle free and everything asked has been delivered 🙂
Once the guys had gone, I re-routed the power to the ONT and Router so that it is fed from a UPS supply in my IT cabinet, this meant extending the 12v power cables.

The ONT uses a 2.1mm x 5.5mm type and the Router needs a 2.5mm x 5.5mm one, both available from Kenables, I also disabled the Routers Wi-Fi and connected one of the Routers LAN ports to my ER605 WAN port supplying my home network.
Neighbours Installation Woes
My neighbour three doors down was having FTTP installed on the 11 Jan and I noticed a lot of head scratching by the Openreach engineers as they walked back and forth to the Joint Box, and it transpires that the duct from his property to the Joint Box Footway is blocked, meaning that a civils crew will need to come out, excavate and clear to obstruction once all permissions and permits have been obtained.

The distance to the Joint box is a lot further than me and the blockage is just upstream of my connection to the common duct, in talking to the install guys they mentioned that the ducting swept Tee to my property was fitted incorrectly and they said I was lucky that they managed to get my fibre installed.
They discovered this after sending a camera down the common ducting to locate the exact position of the blockage.
The swept Tee should go in the direction of the Joint Box so as not to impede the pulling off the cable:


18 January 2022
Openreach civils turned up and excavated where the previous engineers had indicated, unfortunately no telecoms ducting could be found.

The civils guys re-rodded from the Joint Box back towards the blockage and they think the duct blockage is a metre in from the pavement on the neighbours property, so this will need his permission to dig his drive and find the damaged section, this will be done on a return revisit.
30 January 2022
Openreach civils were out on a Sunday to try and locate and repair the blocked duct. The duct was only a few feet away from the first excavation on the 18th Jan and they made a small hole in the duct in order to push a rod into it, from this they could determine accurately the distance to the blockage.


31 January 2022
Openreach civils returned and finally located the damaged section of the duct, it appears that at some point in time, a large amount of concrete was poured which crushed the duct and partially filling it!


The picture below shows the number of tries to locate the damage, the good news is that once the section has been repaired it should be plain sailing for my neighbours installation of FTTP.

1 February 2022
Success – Openreach returned and finally managed to get a rod from the neighbours property, through the open, damaged section, to the Joint Box, they then used this to pull in the fibre cable.
While they were their, they applied forward thinking and pulled in a draw rope from the neighbouring property to the Joint Box in case its needed by them in the future.

All the guys were great, very approachable and amenable to me asking questions 🙂

Excavations made good, shrubs all replanted and the area grass-seeded, great job Openreach.
Web Addresses
- https://dexgreen.com/collections/single-dwelling-unit Dexgreen Single Dwelling Equipment
- https://dexgreen.com/collections/ftth-solutions/products/fiber-optic-demarcation-box
- https://www.ofsoptics.com/ez-bend-optical-technology/ ezbend cable
- https://www.comtecdirect.co.uk/product/internal-customer-lead-in-kit-061825/PG7440/828448
- https://www.premitel.uk/uncategorized/how-to-move-the-fttp-termination-point/
- https://support.huawei.com/enterprise/en/optical-access/echolife-eg8010h-pid-22464421
- https://www.increasebroadbandspeed.co.uk/fttp-full-fibre-broadband-installation
I’d just like to say that this is an excellent overview of the FTTP installation process, many thanks for taking the time to share this.
I’m hoping to have my install completed later this week but they did say it would be a 2-stage install and nobody has been near yet to look at the cable run/duct! Fingers crossed.
Karl.
Hi Karl,
Thanks for checking out the blog and glad it was helpful, I’ll aslo have my fingers crossed that it all goes well for you.
Ian
Thanks for taking the trouble to write up this process, it has been very informative, helpful and well presented.
Glad you found it useful and thanks for the kind comments.
my freedom fibre was connected from a nearby telegraph pole in one day and gives 150mbs.
very small cable on outer wall, less than 5mm.
small box on wall on outer wall, and small box inside wall.
large black router inside.
But I cannot get a TV box to deal with it yet, so my TV YOUVIEW and phone is still run from copper/fibre and TV is still as slow as ever.
The desk top gets 150 mbs.
Sounds a neat install, I’ve not used my Youview box since getting a smart TV. maybe its sign of the future where TalkTalk will stop providing the TV box pushing you towards a new TV or Firestick type solution.
We unfortunately are getting a worse signal now than before fibre was fitted and they haven’t even tried to sort it out.
Hi Andy,
When you say ‘signal’, is that the WiFi coverage to do with the router or the performance of the broadband connection, I found that once the service was up and running it was very stable, however, I had to add eero WiFi extension units to give me full coverage.
If you problem is to so with WiFi coverage, extension units worked for me, also you can try and change the channel of the WiFi as your neighbours might be interfering with it.
As others have said this is an excellent review of FTTP filling in a lot of blanks in my knowledge, many thanks. I hope you don’t mind id I ask a couple of questions.
My friend and I both have TalkTalk Business and have been advised the FTTC service will be unavailable “soon” and we need to move to FTTP. For my friend’s install there is no power socket close to the obvious location for the ONT. One thought was to use a PoE kit to power it up the CAT6 cable. Could you advise the DC spec of your power supply for the ONT? On reading your blog though, I am now thinking to install a long lead in fibre from where the router is through (two walls) to the outside where the customer service point will be. If I can get cable type 100629 do you think Openreach could terminate it rather than having to replace it?
For my install it would be physically similar to the above. However I would like to continue using my RT-N66U router and Ubiquiti WiFi network. Am I correct in thinking you are using a non TT router? Were there any issues in setting it up?
G
Hi and thanks for getting in touch.
If you know a friendly Openreach engineer who would give you a ‘inside out’ fibre cable, then running it to exactly where you and the ONT is the best option, I bought an ‘inside out’ cable off eBay, but it wasn’t compatible with their splicer, (more likely it would have ended up ‘a non standard’ installation), the guys were great and helped me to run their ‘inside out’ fiber to where I wanted the ONT, the run was was mostly in conduit I had already installed in advance, so pulling a fibre in was painless.
If you make the fibre run easy for the installers and do most of the work for them in advance, I’m fairly sure they would be accommodating in getting the fibre where you want it, powering over CAT6 is a good fallback as your remote PSU could be UPS protected along with other IT kit.
The Openreach ONT is 12v DC @ 0.5A, you could use these to connect the PSU to the CAT6 for power (link to barrel to wire converter).
I was using a Non TalkTalk router and it worked fine with no setup issues, unfortunately my TalkTalk email was spoofed by fraudsters, so I left TalkTalk for Youfibre and I have to use their router.
Hope this helps
Ian