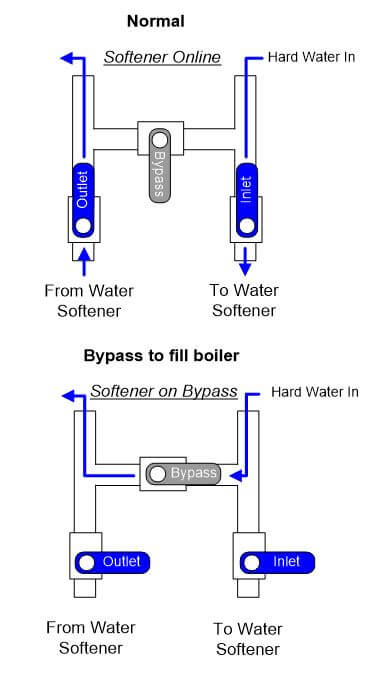
Jump to Ricks TwinTec Low Salt Alert
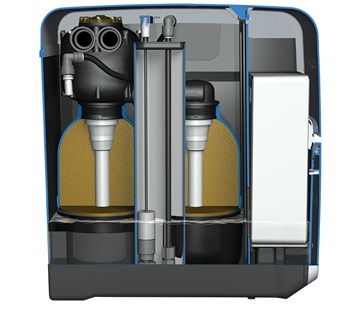
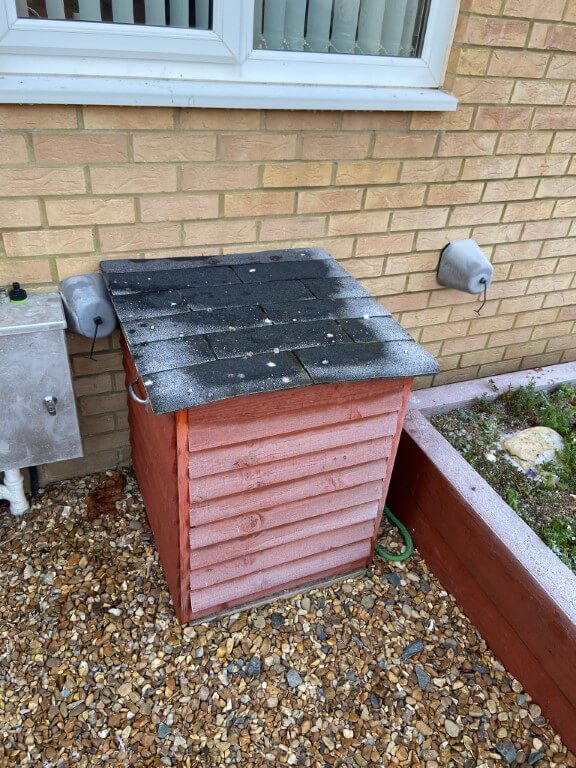
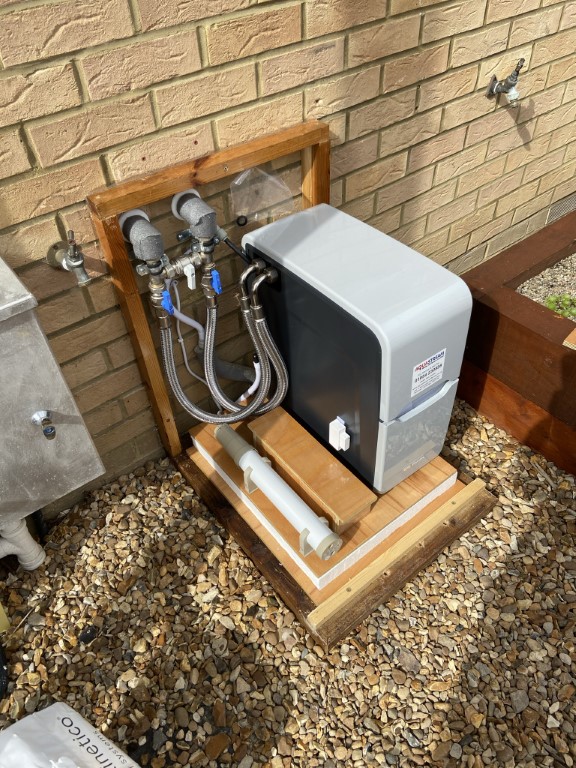
Being a new water softener user, (March 2021), I was constantly checking the level of the block salt my Kinetico Premier Compact uses and as my unit is outside due to space restrictions, I thought there must be away to remotely alert if more salt was required.

Final Version (23 February 2022)
Below you will find a number of different versions and iterations of my attempt at alerting to low salt level in the water softener, this is what I have ended up with.
- No additional devider required to keep the salt blocks apart in the softener, this caused the salt block to jam 🙁
- The Sonoff wireless contact was simply out of range of wifi reception no matter what I did, this caused it to intermittently drop offline and eat batteries, so this was removed.
- Replaced the Sonoff with a Pyronix Nano door contact:
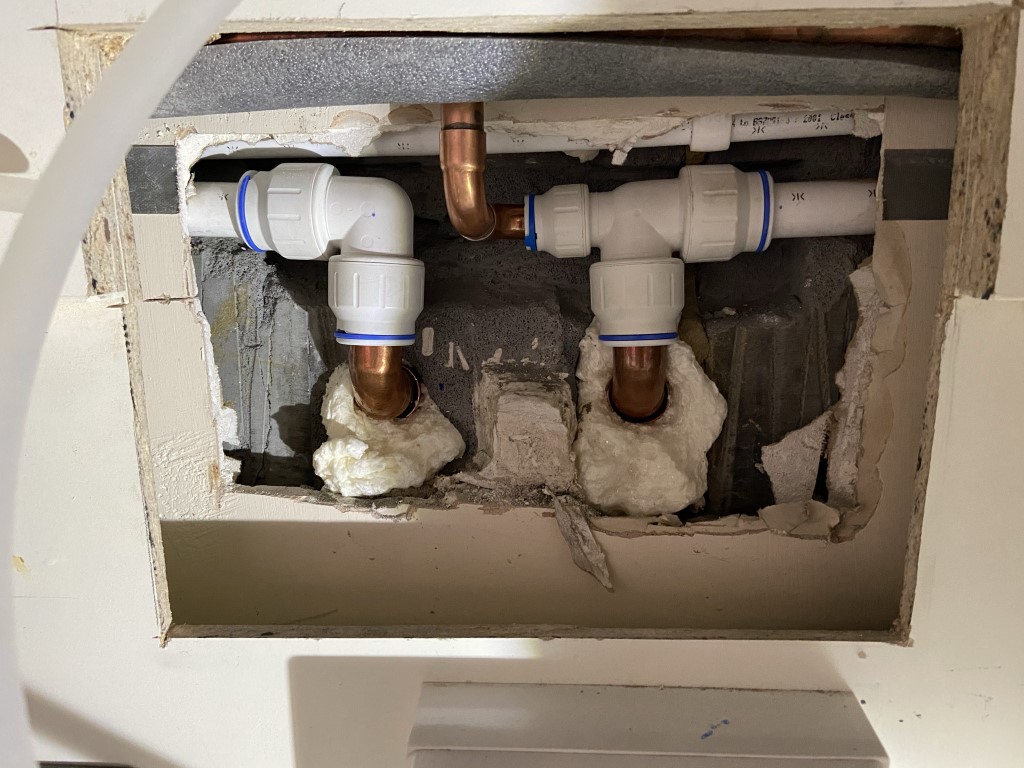
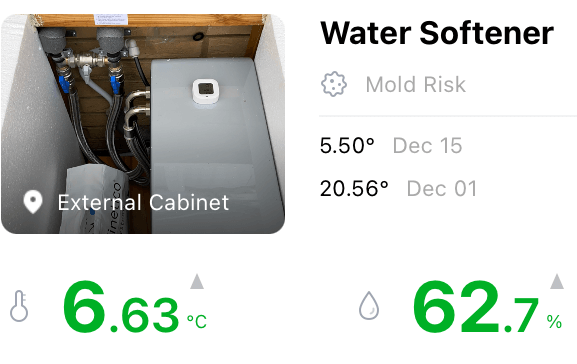
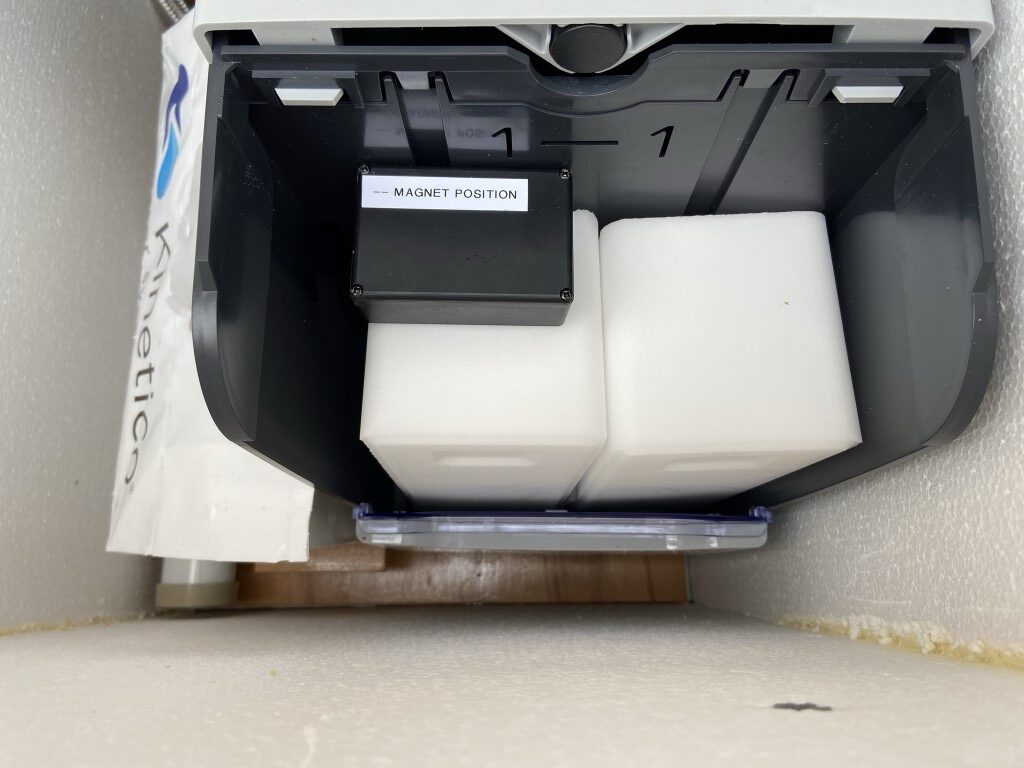
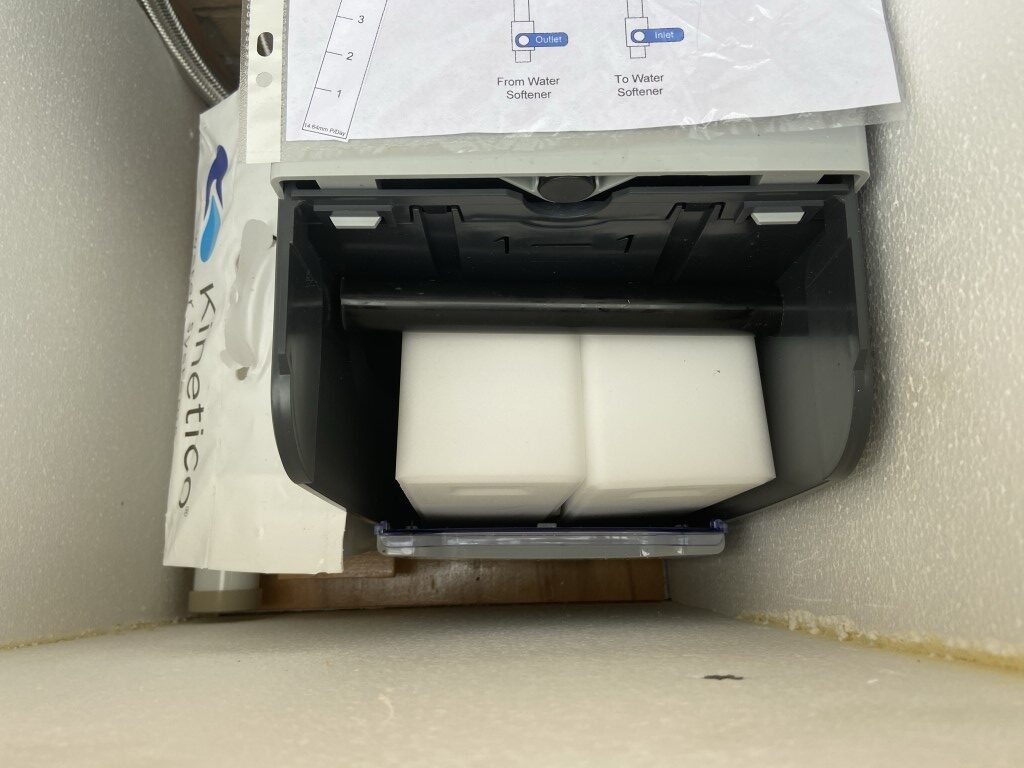
The magnet carrier within the softener remained the same, simply resting on top of one of the blocks and the Nano contact velcroed on the side of the casing, in the same place where the Sonoff used to be.
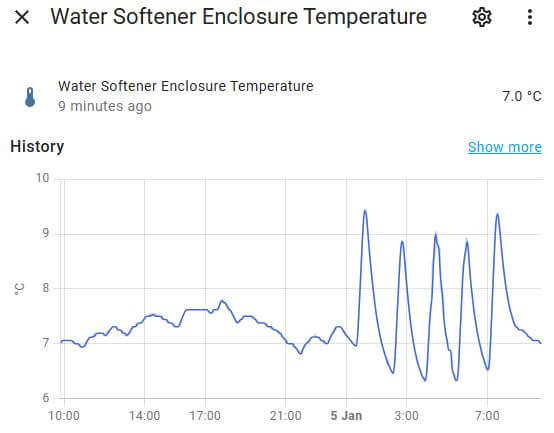
A little circular magnet gives me a level indication of the salt block, average usage is about 11mm of salt block erosion per day.
The Nano contact links into the house alarm system and is configured to log events and act as a simple switch to operate a relay when the contact opens or closes, this is a totally independent function of the alarm and will not cause an alarm activation if the salt goes low 🙂
I have brought the Sonoff switch inside and it is now triggered by the relay which changes state based on the Nano, this allows a ‘Scene’ to run, switching on and off a mains lit sign when the salt is low as well as an App notification.
The use of using an intruder alarm contact is that communications between the contact and the alarm is monitored as is the battery condition, giving me a failure alert which I didn’t have with Sonoff.
This setup has been in use for about two months and has worked really well, I think this may be the last time I have to play with it!
Version 4 (21 May 21):
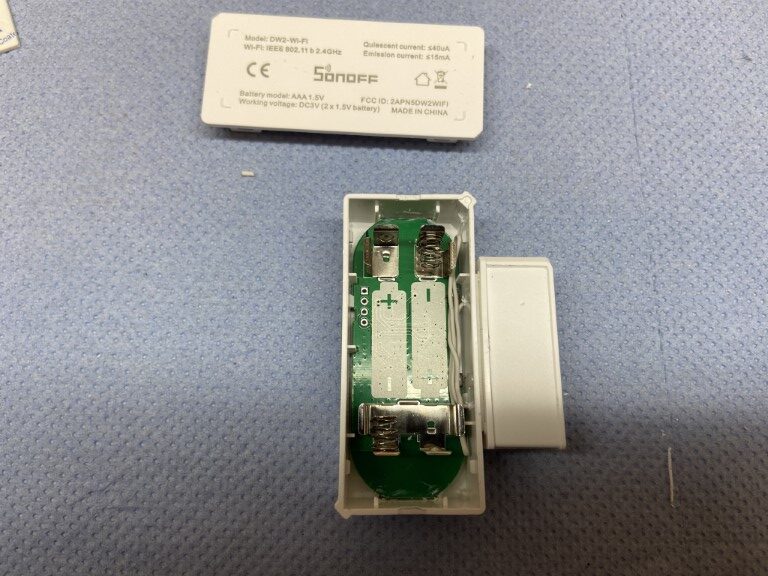
I have used Sonoff Smart devices for a number of years which are monitored and controlled via the eWeLink App on my iphone and ipad so I knew this was the non invasive way to go, especially as the DW2 battery level and online status is monitored and alerted on the App .
Caution – The method I’m using is not fail safe, please don’t blame me if your water reverts back to being hard because you ran out of salt :-).
The idea is that a strong magnet will be carried on top of the left hand salt block as this was observed to be slightly lagging the right hand one as the blocks dissolve.
The magnet will be lowered by the dissolving salt until a point is reached which it will trigger the Sonoff sensor which will be attached to the outside of the water softener, this will then trigger an alert via WiFi and the eWeLink mobile App as below.
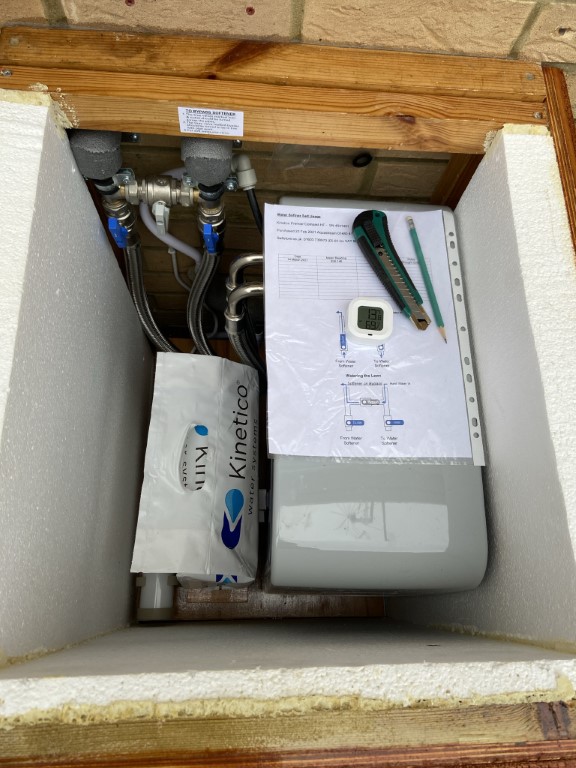
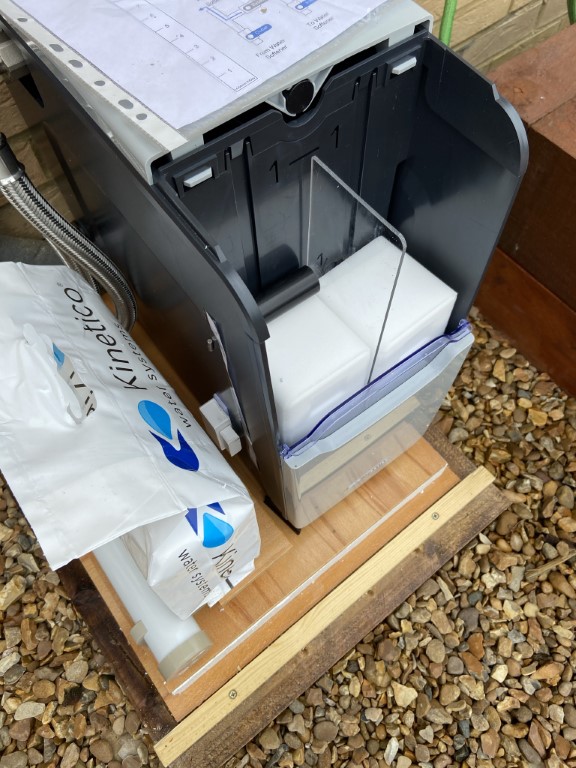
A 90mm length of 25mm PVC tube with sealing end caps sits on the salt block, inside the left hand cap is a 20mm x 4mm disc Neodymium magnet. To enable the magnet to be guided throughout its travel, a Perspex divider is used between the two blocks.
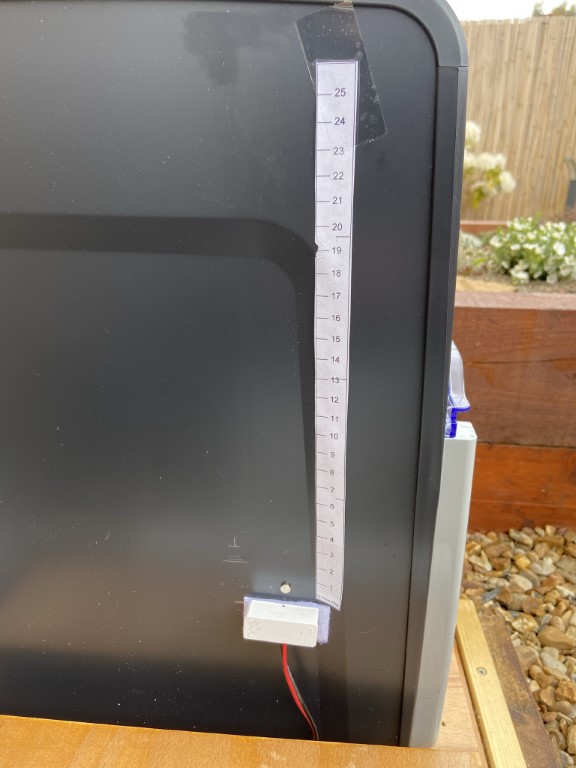
On the outside of the softener the Sonoff switch is fixed with Velcro at a height which will give me a few days notice of low salt, with the wires from the switch have been extended to the Sonoff transmitter, and this is now mounted as high as I could get it within the enclosure in an attempt to get the best WiFi signal.
I also decided to use a smaller magnet on the outside of the softener to show the position of the salt block magnet, a graduated strip shows approximate days salt usage left (26 days per 8Kg).
The level detectors signal strength is quite good and seems to work, but its still early days and more monitoring is needed before I can say with certainty that it can be relied upon fully.
On thing to App allows you to do is link to other devices in the Sonoff range, I have set a ‘scene’ so that on low salt detection, a mains powered light will turn on in the house giving me a visual indication, which is a great feature.
Testing of the Sonoff is very easy, I simply place an external magnet near the device to confirm operation.
NOTE: Most of the difficulties in my installation have been with WiFi signal, if your softener is indoors, an unmodified DW2 with a magnet in a tube would work just fine 🙂
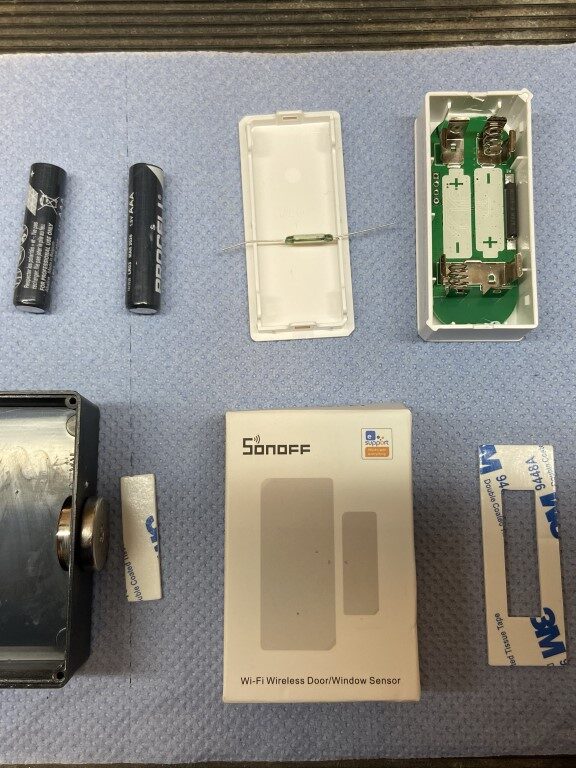
Sonoff Devices
The WiFi sensor I used was the battery operated stand-alone Sonoff DW2 -WiFi wireless Door/Window Sensor, as I already had a number of Sonoff devices and the eWeLink App on my iphone.
I did modify the sensor as described further on, but I didn’t have too, as the App had a selectable setting to push notify when the sensor either goes Closed or Open, equating to ‘seeing a magnet’ or ‘not seeing a magnet’ which if I’d known first I wouldn’t have gone to the effort of taking it apart :-).
A key takeaway is that the Sonoff must be in range of your WiFi, obvious I know, but it caught me out!
How it evolved to the working version
The Sonoff modification would be to change the original Reed Switch which is normally kept closed and out of an alert condition by the presence of a magnet, I needed the opposite of this, the introduction of a magnet would cause an alert, (as mentioned earlier, this really doesn’t matters as the App settings could have solved this).
So to the shopping list, all of eBay:
Version 1
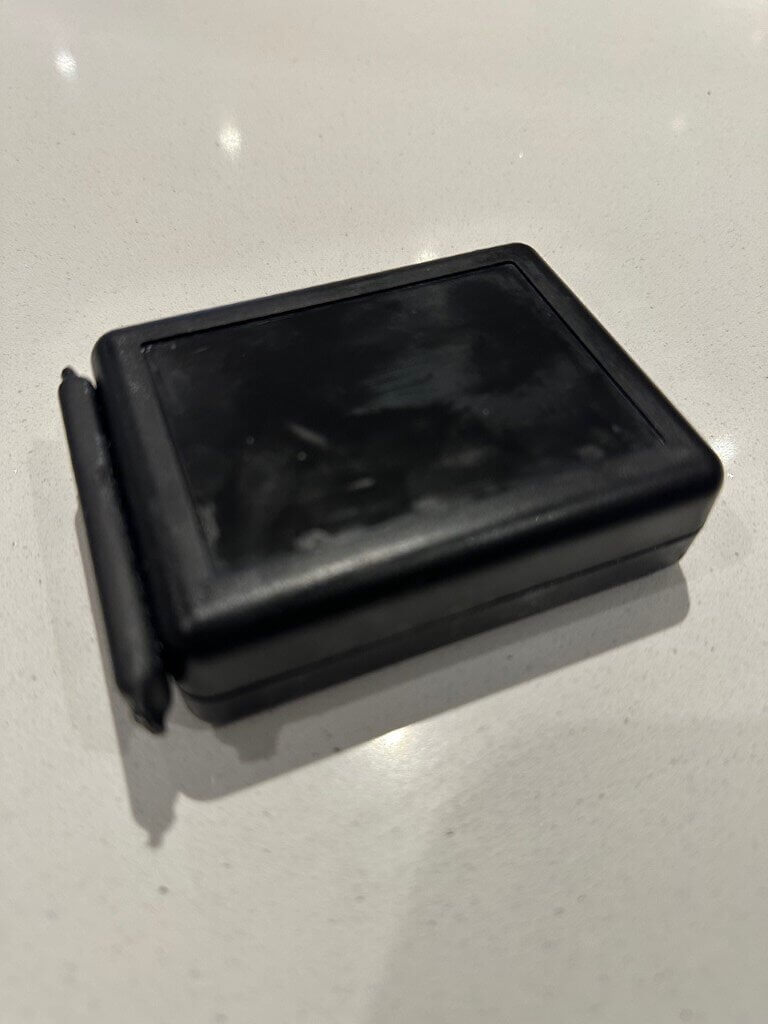
- ABS Box (75.5 x 49.5 x 28) @ £4.50,
- Disk ring Neodymium magnet 20 x 4mm @ £4.89 for two,
- Reed Switch 3 pin magnetic switch normally open closed conversion 2.5 x 14mm @ £4.79 for five,
- Sonoff DW2 – WiFi Door/Window Sensor Smart Switch @ £8.15,
- AAA batteries x2 (already had),
- Piece of Velcro sticky back Hook & Loop,
- Glue CT1 (already had),
- (Version 2) offcut of 22mm and 20mm plastic conduit (already had).
Parts came to ~£23.00
Version 1 – First job was to glue the disc magnet inside the ABS box, after trail and error, the best place for the magnet was the rear left side of the box.
Next task was to remove the reed switch which comes with the DW2, this is easily identified as the long thin black rectangular component on the same side as the battery clips, this simply unsolders from the PCB pads.

The PCB is held in place by a small blob of white silicon at each end and a clip, using a small screwdriver to carefully prise the board out does the trick.
I originally soldered the normally closed reed switch in the same places as the original, but I thought I needed to get the reed switch as close as I could to the wall of the softener, so I used the Sonoff’s magnet enclosure to hold the normally closed reed switch after attaching so flying leads.
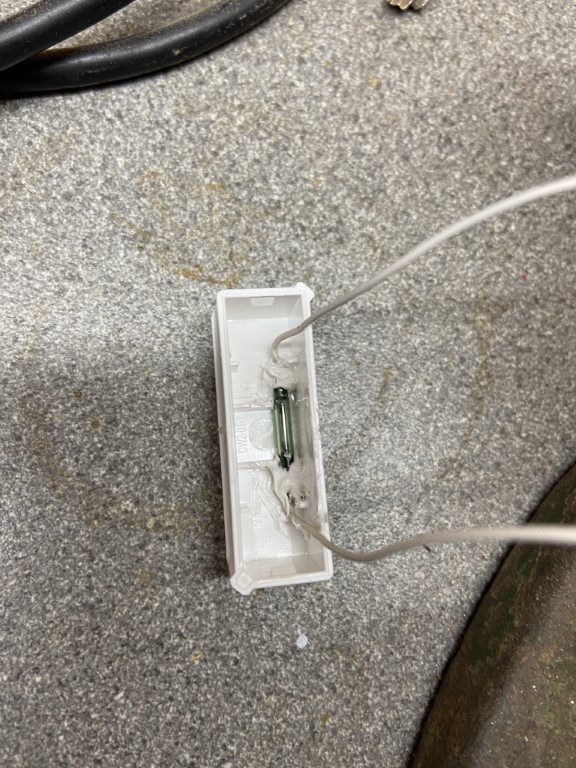
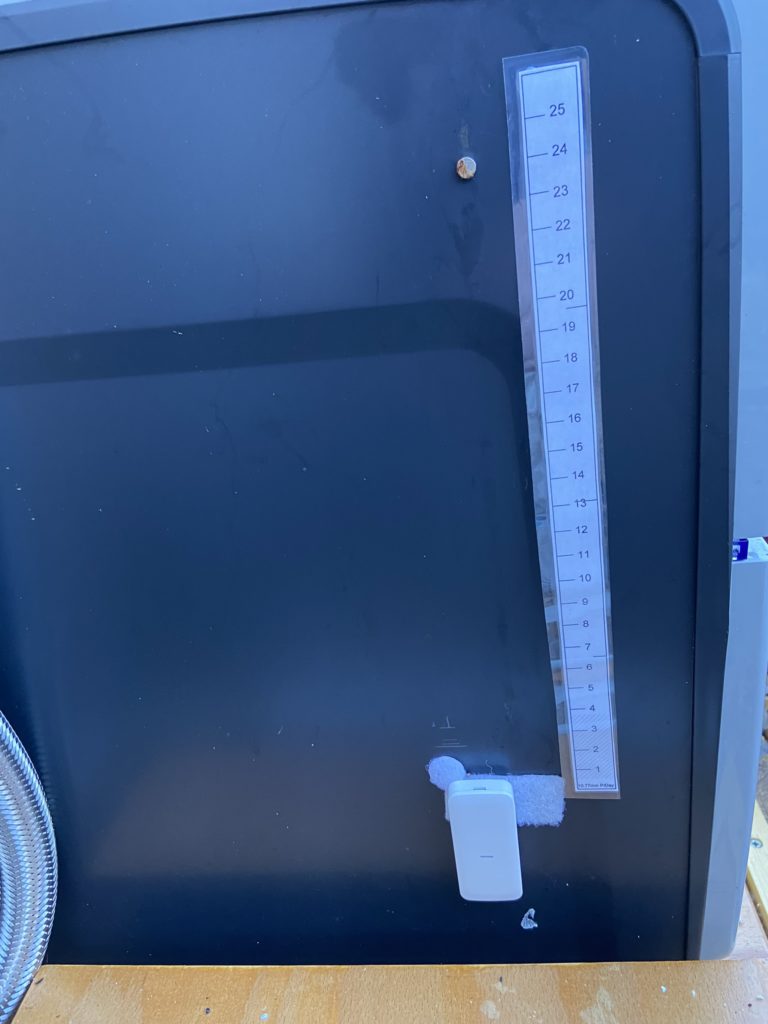
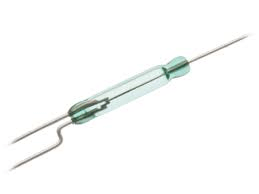
The image below shows the type of reed switch I needed to fit as I had to change the reed to be normally closed without the presence of a magnet, telling the DW2 door sensor that the door was closed, when a magnet is introduced, the reed moves position within the glass envelope, breaking the circuit, triggering the DW2 to alert to a door open which in our case is low salt level.
A couple of holes were drilled and the wires from the reed switch were soldered to the PCB pads.
Once the eWeLink App is downloaded and an account is created (can be free but I chose to pay the nominal fee), the DW2 can be paired on the 2.4GHz WiFi home network, this is incredibly easy, open the app, press and hold for 5 seconds the push switch on the DW2 until a red LED flashes, back on the App – Press add device and after entering your WiFi details, the DW2 is paired 🙂
Details can be configured in the App, including changing the alert description, push notification and sharing the alerts with other eWeLink accounts if needed.
Now the moment of truth – bringing the magnet close to the reed switch should trigger the App status to show the switch is open and change to closed when the magnet is moved away.
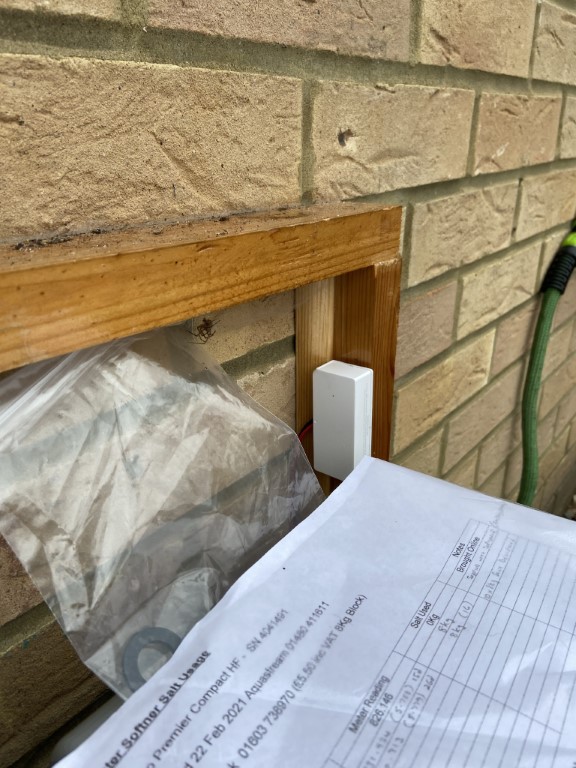
As my block salt level was low, I noticed that the blocks tilts back slightly in use, I put the ABS box on top of the left hand block and due to the lean it should stay in the same place on the block as it drops.
I offered up the DW2 to the outside of the softener while watching the App status, moving it up and down the outside of the unit until it triggered, I marked with a pencil using the top of the DW2 on the cabinet the point at which I wanted an alert, I then stuck a strip of self adhesive Velco hoops under the pencil line.
The magnet I used is deliberately powerful, and it was no surprise that it operated the reed switch when it was some distance away from the reed switch and will continue to hold the reed switch open for a fair bit of travel as the salt level lowers, this was factored during the setup process.
Using Velco I secured the DW2 to the softener as this allows for fine adjustments and the job is done.
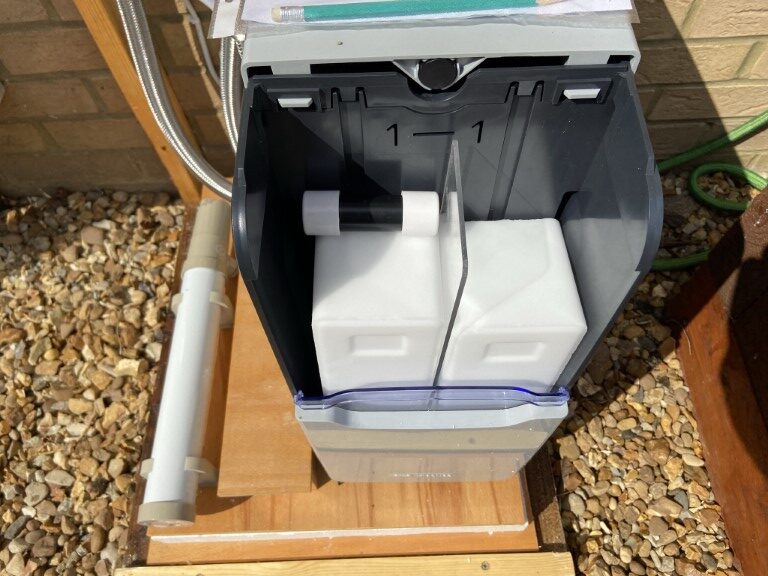
Salt changed and system ready with room for the lid.
Version 2 – Magnet Carrier
A few days after changing the block salt, I decided to see how the ABS box magnet carrier was sitting on top of the salt …………disaster!
As you can see from the picture, the left hand salt block has leaned over to the right taking the magnet too far away from the side wall, it may well be that when the salt block drops it may once again move to the optimal position for the magnet, I didn’t want to take the chance, so here is Version 2 which will defiantly need further revisions.

I took the two magnets out of the ABS box and cut two pieces of plastic conduit, the 25mm conduit spans the salt block gap, with a shorter piece of 20mm conduit glued inside it, the magnet was glued inside the 25mm pipe with the 20mm pipe acting as a backstop.
It was important that the magnet was flush with the end of the pipe as I’ve ordered some plastic end caps as I don’t want any metal contact with the salt or brine solution.
Its quite hard to see, but the conduit pipe bridges both salt blocks, I put a magnet at each end so it wasn’t important which way round I put it in.
The major problem with this design is that the pipe will hit the salt grid which I have only just noticed, so watch this space!
Version 3
To address the problems with Version 2, I bought a piece of 3mm thick Perspex and cut it to act as a full height guide for the left and salt block, the guide simply rests against the salt and the existing salt grid assembly.
I cutdown the magnet tube holder to be a nice fit and this time I’m only using one magnet to bias rather than trying to balance the tube.
Lessons Identified
1 . Make sure you have a solid WiFi signal where the DW2 is fitted.
The eWeLink App shows signal strength that the DW2 is seeing, however, once I put the box around the softener, the received signal strength fell and the DW2 went offline. To resolve this I changed one of the kitchen sockets, which is near to the softener, to a WiFi extending version from Screwfix (988FV) and this worked fine.
2 . The DW2 eWeLink allows for a selectable Push Notification to your phone if the switch either opens or closes, I could have left the DW2 as it arrived out of the box and made the change in the App rather than physically modify the DW2.
3 . My salt level was falling at a rate of 14.6mm per day and we will always have 8Kg available (Block 280mm tall/14.6mm daily usage = 19 days per 8Kg). This was the first salt the softener had used, so it may slow down, the point being to set the alert level to suit adding a new block straight away, or as a trigger to re-order or change it in X days, the positioning of the DW2 determines the alert trigger.
You could always add another DW2 using the same magnet, with one DW2 set as a pre-salt order trigger with the other DW2 as the block change alert.
4 . The ABS box for the magnet was just the right size, if it was any larger it might not allow the lid to close in the salt compartment when a new block was fitted, but it was small enough to give me an alert on low salt level with 30mm salt left (day and halfs worth).
5 . Keep an eye on things in case they don’t go to plan, hence Version 2 🙂
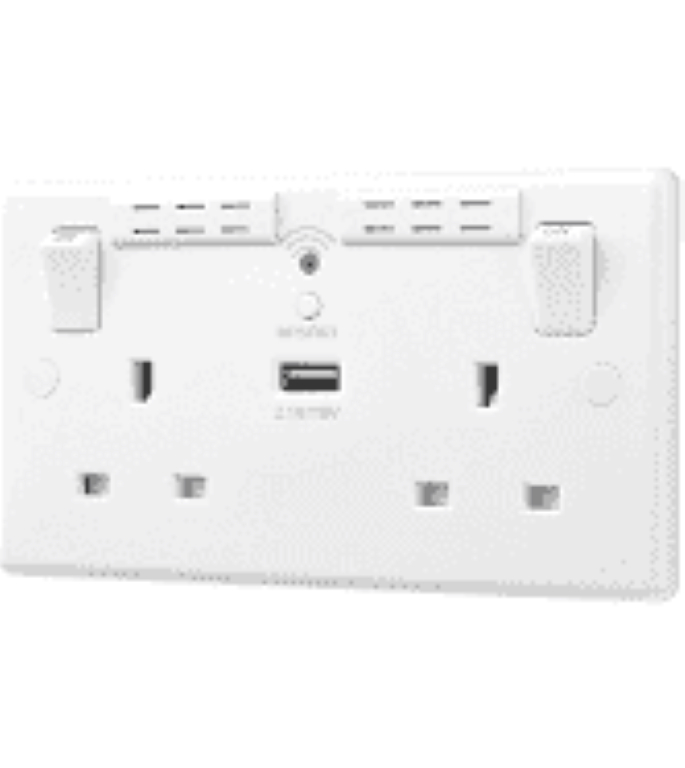
Ricks TwinTec Softener Alert

Rick got in touch as he has a TwinTec water softener and was looking to also have a low salt alert and sent me a list of parts he was going to use and his ideas:
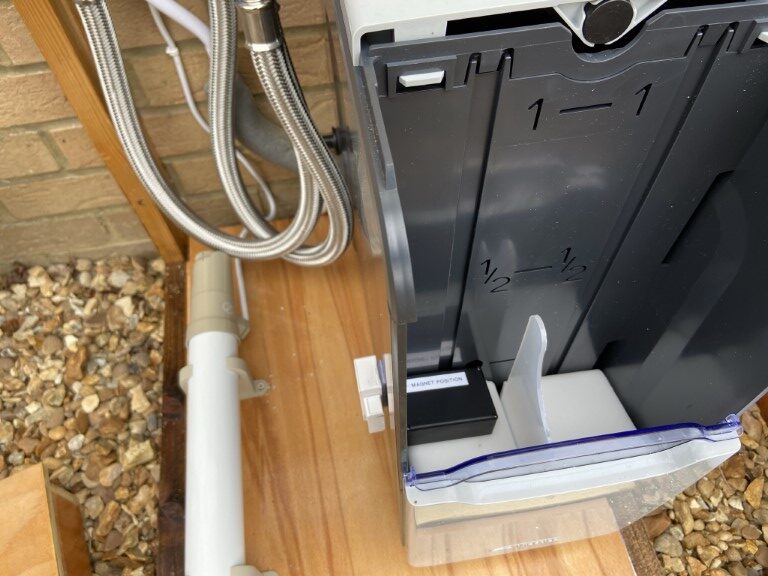
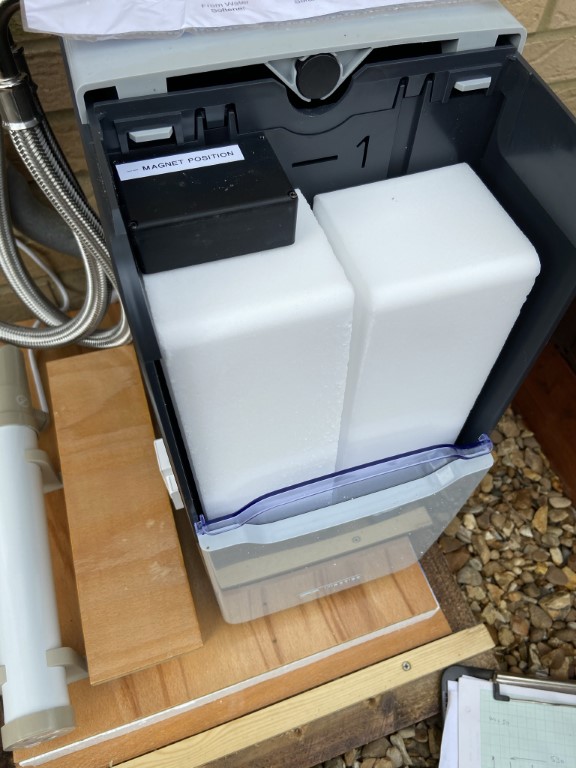
Ricks design was for the magnet which triggers the wireless door sensor to mounted on the outside of a waterproof box which sits onto of one of the salt blocks, the external magnet will also space the box away from the side wall, the wireless sensor will be affixed to the outside of the softener.
The final location of the sensors exact position will be by ‘test & adjust’, making sure it triggers when the salt level is at the right point that it needs replacing.
With the aid of a Zigbee repeater (Hubitat C8), when the sensor triggers an alert is set to Ricks phone and Alexa speakers announce out loud ” replace salt in water softener“, but so as not to wake everybody, Rick has set the announcement to stay quite between 10pm and 9am.
Really pleased it works for him and a great project, so thanks for allowing me to share it.