I follow ‘Speak to the Geek’ on YouTube and one of his projects was to control the speed of a fan based on temperature, this blog is how mine ended up.
Full credit goes to ‘Speak to the Geek’ and his homepage where a full description of parts and build are HERE.
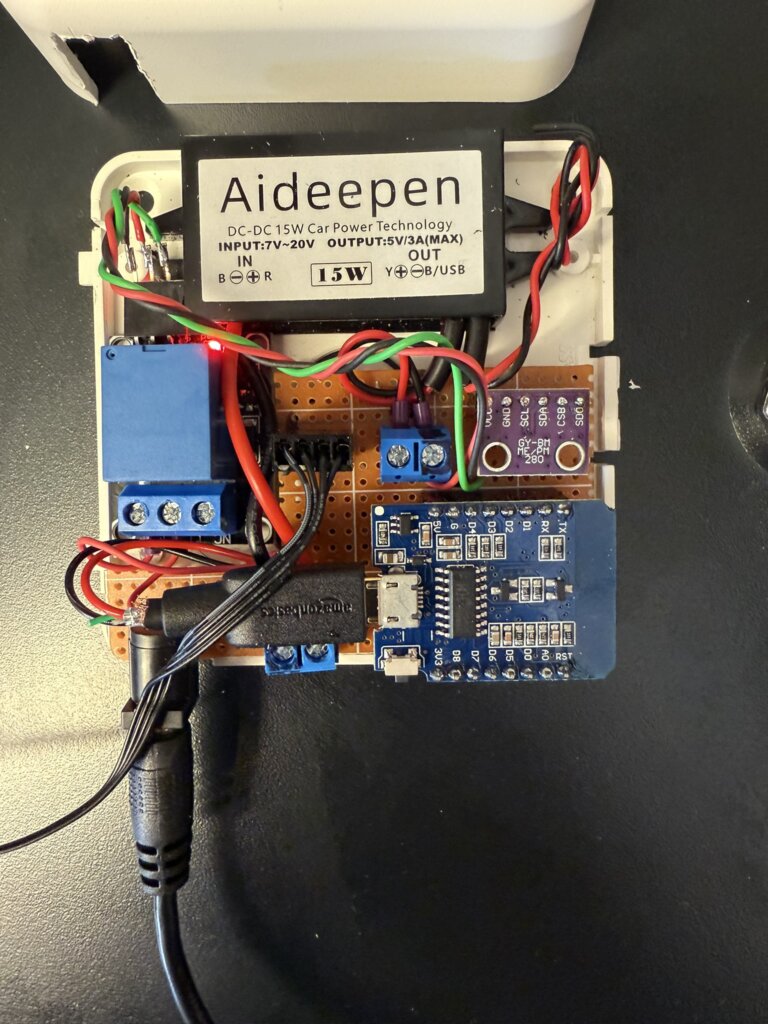
The reason this tweaked my interest was to try and maintain a steady temperature in my home IT cabinet and it works with Home Assistant.
My current cooling arrangement has fans which simply trigger on high temperature, hopefully this will smooth out the ‘on – offs’.
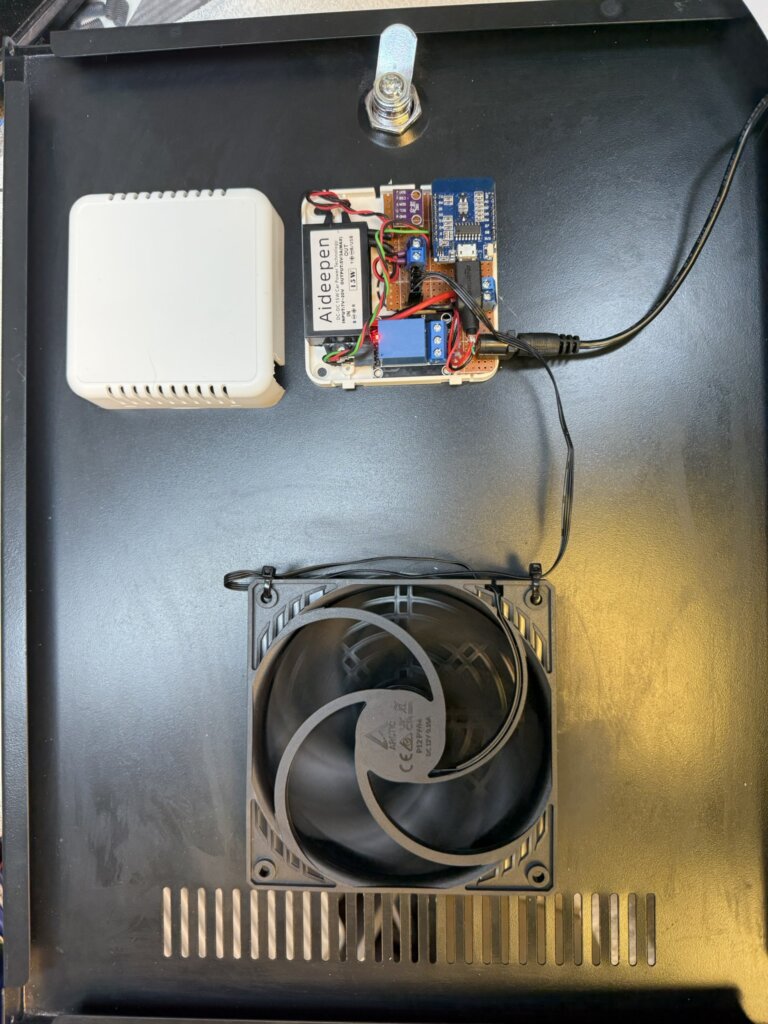
I had a spare ‘Room Sensor Enclosure‘ which I bought from The Pi Hut which everything managed to fit inside.
The 120mm fan will turn on at 28oC at a preconfigured speed of 25%, as the temperature increases, so will the fan speed, reaching full speed at 31oC.
I have a automatic filling water bowl for the dog community in the area which is very popular, (Facebook Link), the water is fed by an 8mm pipe to the bowls float system and works really well, the problem I’m trying to stop is excessive water use, typically if the filling feed pipe becomes detached and goes unnoticed leading to wasting water.
My idea is to use a latching solenoid valve and flow meter linked to a Shelly Uni Plus with automation controlled by Home Assistant.
In normal operation the valve would be open and the flow to the bowl monitored, (the bowl takes 2.8 litres to fill from empty), should the flow exceed 5 litres, indicating excessive use, the solenoid valve will be pulsed by the Shelly Uni Plus and the flow turned off, if this occurs a message will be sent to my mobile.
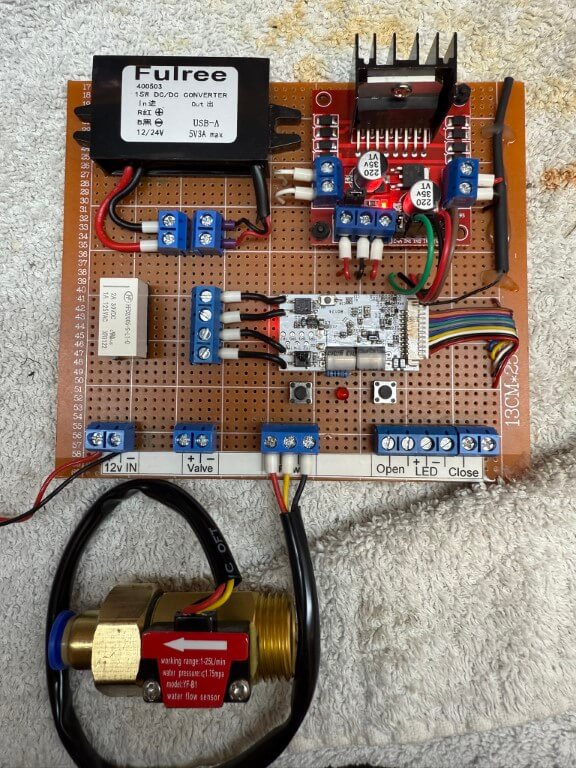
Water controller on bench testing.
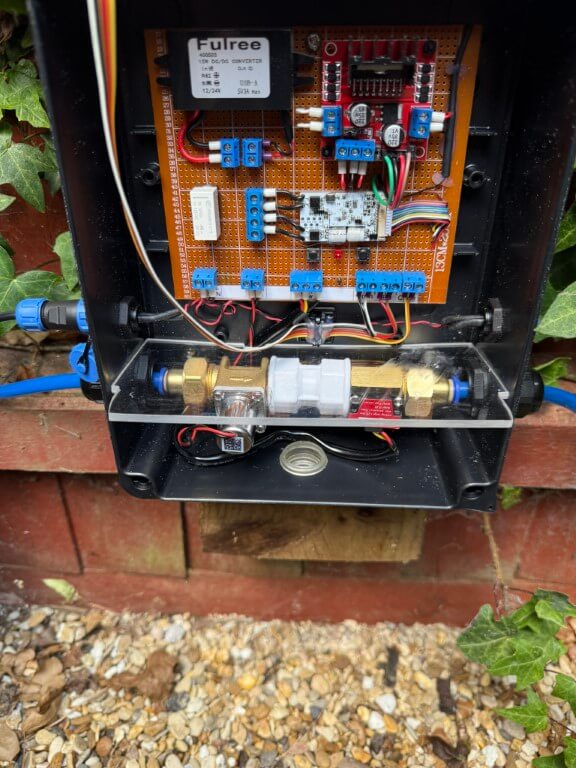
Underside of the controller board. 28 July 25, flow sensor 5v derived from the DC/DC converter directly.
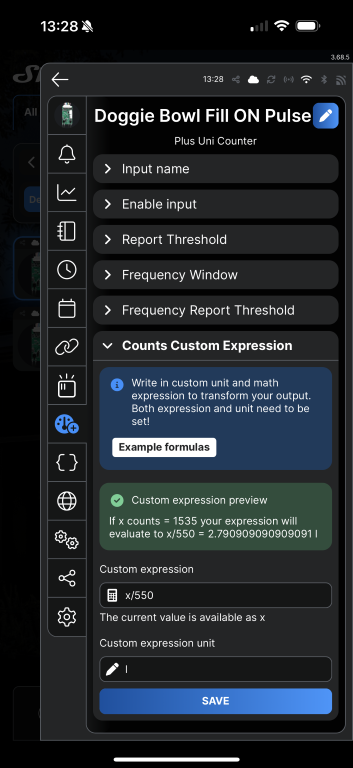
The flow sensor used is a YF-B1 bought from Aliexpress, the instructions said that 660 pulses = 1 litre, to calibrate this for the doggie bowl, I measured 2.8L into a bucket and the count was 1535, adjusting the expression value to x/550 until it read 2.79l, which is near enough!
The Shelly Uni Plus requires an ‘active low level’ pulse to trigger to register a count, the user guide quotes a trigger voltage of 1.5v, the flow sensor is powered from the 5v side of the DC/DC converter and works fine on the test rig.
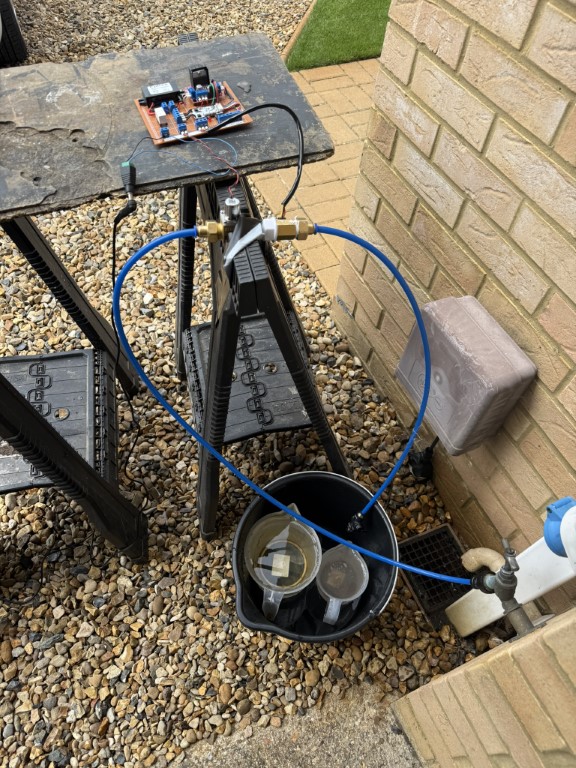
Test setup with mains pressure water feeding into the solenoid in the open state but with the valve at the end of the pipe closed, once all previous counts on the shelly were reset to zero, I opened the manual valve and filled the measuring jugs (2.8l), this gave me the counts recorded value.
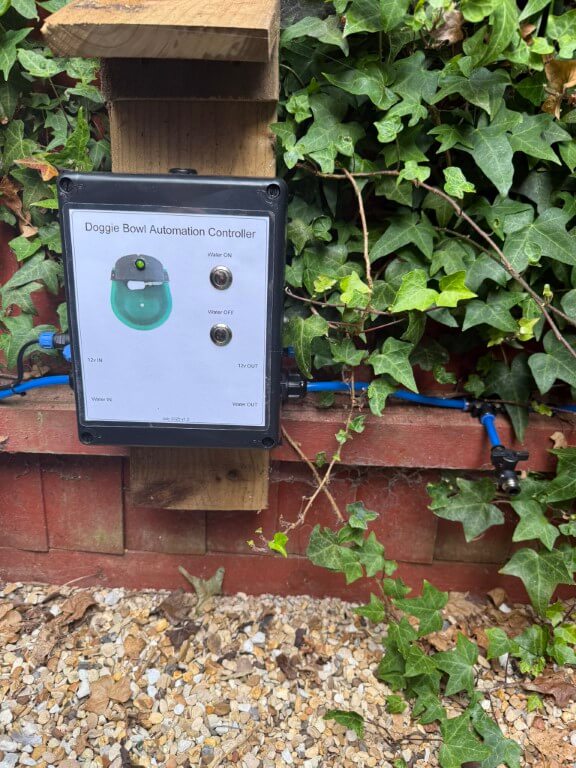
Front cover laminated and stuck on with double-sided tape, all holes sealed with silicone sealant to try and keep the lamination in tact.
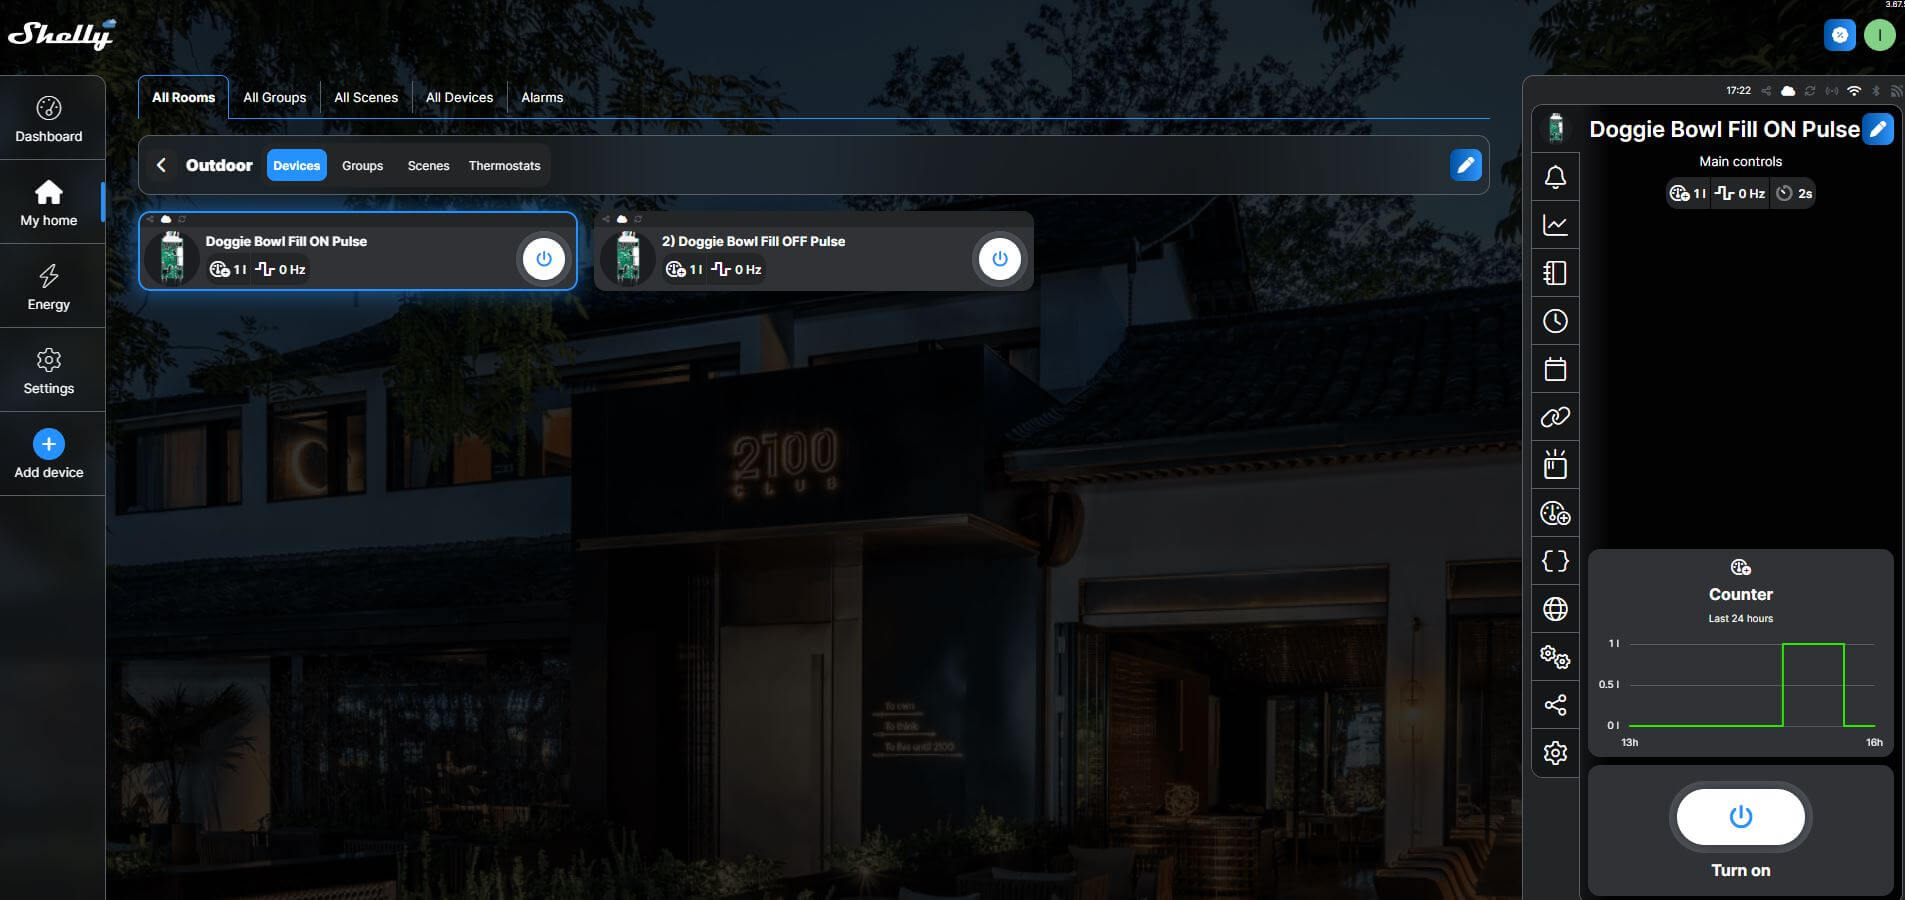
The above is a screenshot of the Shelly Cloud website displaying my Shelly Uni Plus, the ‘Count’ input was used for the flow meter and each of the two Shelly outputs were assigned as ‘ON’ Pulse and ‘OFF’ Pulse.
The latching solenoid valve requires a 30 millisecond pulse of 5v to latch open, reversing the polarity and applying another 30 millisecond pulse will close the valve, the Shelly has this feature built in.
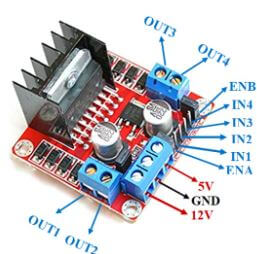
The L298N was fed with 5v with the switching inputs going to pins IN1 & IN2, (IN1 & IN3 linked as were IN2 & IN4), this was done to get two mirrored outputs from the L298N.
One of the 5v pulsed outputs from the L298N goes to a latching relay, this enables a visual indication of the status of the solenoid valve via an LED, whilst the other 5v pulsed output goes directly to the solenoid valve.
Automation
Within the Shelly App is ‘Counts Custom Expression’ which for my flow meter is x/550 with the expression unit being l (litres) for a volume of 2.8L which is a complete refill of the doggie bowl.
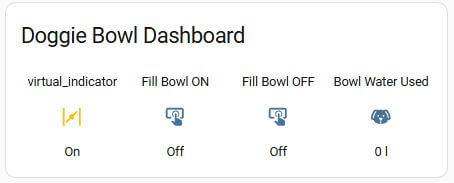
Home Assistant integrates with Shelly and shows the counter as either a counter value in Litres (set up above), and actual pulses recorded, both of these are cumulative values.
For my purposes I want the open solenoid fill valve to close once 5 litres have pasted through the flow meter in 24 hrs, indicating excessive use.
In order to get the counter value to reset at midnight, I used a Helper and defined the counter entity as a Utility-Meter with a daily reset time and renamed this as Bowl Water Used.
Within Automations, the rule is –
When Bowl Water Used is above 5 litres
Then Turn Off fill bowl & send mobile notification
Completed Project
Unit plumbed in and 12v power getting connected, another 12v connection is opposite the inlet for future use.
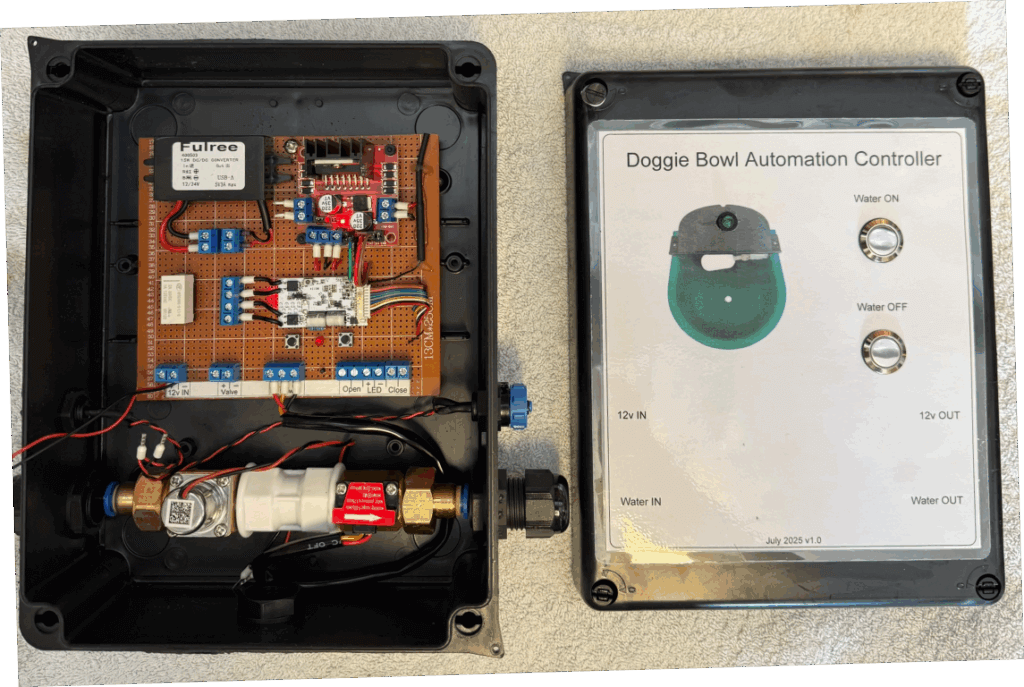
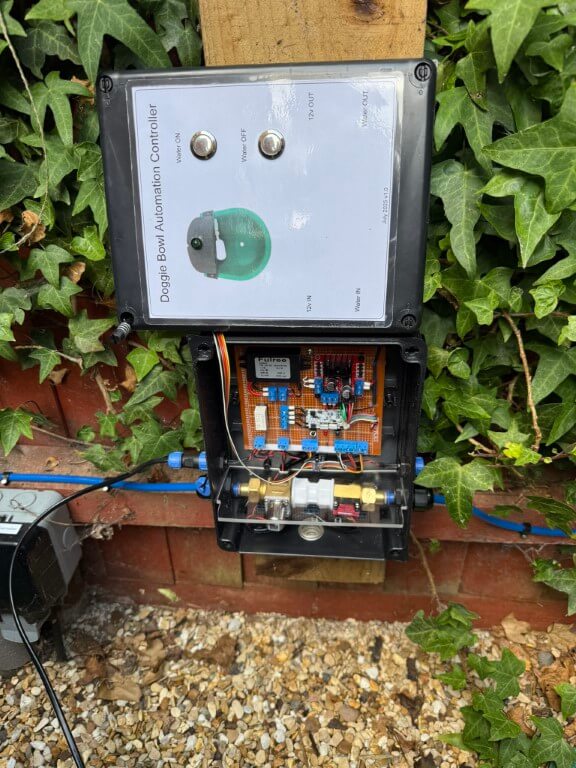
I fitted a perspex divider between the water side and electronics to reduce any damage in the event of a leak, if any water does accumulate, the box has drain holes drilled in the rear of the box and a ‘tell tail’ clear grommet.
Green LED indicates if solenoid valve is latched open, local control of the valve is via the pushbuttons. On the feedpipe to the doggie bowl a drain down/test point is fitted.
To limit rain getting on the control box, I’ve made a small wooden overhang, the enclosure is IP65 rated but I’m trying to keep water from getting into the laminated front panel details.
My Home Assistant display shows the valve position and water used, it is also possible to manually operate the solenoid valve from the dashboard.
Observation
When I emptied the bowl to clean it, the float valve operates to refill the bowl, however, water volume recording is ‘hit and miss’, I’m putting this down to the bowls float valve not being fully open, restricting the flow volume though the sensor leading to detection errors, however, opening the test point into a bucket at full bore, approximately 6 liters flows before the automation closes the solenoid valve to prevent water being wasted which is the main function of this project.
A blog about stuff that interests me or I have done.
We use cookies on our website to give you the most relevant experience by remembering your preferences and repeat visits. By clicking “Accept All”, you consent to the use of ALL the cookies. However, you may visit "Cookie Settings" to provide a controlled consent.
This website uses cookies to improve your experience while you navigate through the website. Out of these, the cookies that are categorized as necessary are stored on your browser as they are essential for the working of basic functionalities of the website. We also use third-party cookies that help us analyze and understand how you use this website. These cookies will be stored in your browser only with your consent. You also have the option to opt-out of these cookies. But opting out of some of these cookies may affect your browsing experience.
Necessary cookies are absolutely essential for the website to function properly. These cookies ensure basic functionalities and security features of the website, anonymously.
Cookie
Duration
Description
_GRECAPTCHA
5 months 27 days
This cookie is set by the Google recaptcha service to identify bots to protect the website against malicious spam attacks.
cookielawinfo-checkbox-advertisement
1 year
Set by the GDPR Cookie Consent plugin, this cookie is used to record the user consent for the cookies in the "Advertisement" category .
cookielawinfo-checkbox-analytics
11 months
This cookie is set by GDPR Cookie Consent plugin. The cookie is used to store the user consent for the cookies in the category "Analytics".
cookielawinfo-checkbox-functional
11 months
The cookie is set by GDPR cookie consent to record the user consent for the cookies in the category "Functional".
cookielawinfo-checkbox-necessary
11 months
This cookie is set by GDPR Cookie Consent plugin. The cookies is used to store the user consent for the cookies in the category "Necessary".
cookielawinfo-checkbox-others
11 months
This cookie is set by GDPR Cookie Consent plugin. The cookie is used to store the user consent for the cookies in the category "Other.
cookielawinfo-checkbox-performance
11 months
This cookie is set by GDPR Cookie Consent plugin. The cookie is used to store the user consent for the cookies in the category "Performance".
CookieLawInfoConsent
1 year
Records the default button state of the corresponding category & the status of CCPA. It works only in coordination with the primary cookie.
PHPSESSID
session
This cookie is native to PHP applications. The cookie is used to store and identify a users' unique session ID for the purpose of managing user session on the website. The cookie is a session cookies and is deleted when all the browser windows are closed.
viewed_cookie_policy
11 months
The cookie is set by the GDPR Cookie Consent plugin and is used to store whether or not user has consented to the use of cookies. It does not store any personal data.
Functional cookies help to perform certain functionalities like sharing the content of the website on social media platforms, collect feedbacks, and other third-party features.
Performance cookies are used to understand and analyze the key performance indexes of the website which helps in delivering a better user experience for the visitors.
Analytical cookies are used to understand how visitors interact with the website. These cookies help provide information on metrics the number of visitors, bounce rate, traffic source, etc.
Cookie
Duration
Description
_ga
2 years
The _ga cookie, installed by Google Analytics, calculates visitor, session and campaign data and also keeps track of site usage for the site's analytics report. The cookie stores information anonymously and assigns a randomly generated number to recognize unique visitors.
_ga_92TJCVGJP2
2 years
This cookie is installed by Google Analytics.
_gat_gtag_UA_48800884_1
1 minute
Set by Google to distinguish users.
_gid
1 day
Installed by Google Analytics, _gid cookie stores information on how visitors use a website, while also creating an analytics report of the website's performance. Some of the data that are collected include the number of visitors, their source, and the pages they visit anonymously.
CONSENT
2 years
YouTube sets this cookie via embedded youtube-videos and registers anonymous statistical data.
is_unique
5 years
StatCounter sets this cookie to determine whether a user is a first-time or a returning visitor and to estimate the accumulated unique visits per site.
is_visitor_unique
2 years
StatCounter sets this cookie to determine whether a user is a first-time or a returning visitor.
sc_is_visitor_unique
2 years
StatCounter sets this cookie to determine whether a user is a first-time or a returning visitor.
Advertisement cookies are used to provide visitors with relevant ads and marketing campaigns. These cookies track visitors across websites and collect information to provide customized ads.
Cookie
Duration
Description
NID
6 months
NID cookie, set by Google, is used for advertising purposes; to limit the number of times the user sees an ad, to mute unwanted ads, and to measure the effectiveness of ads.
VISITOR_INFO1_LIVE
past
A cookie set by YouTube to measure bandwidth that determines whether the user gets the new or old player interface.
YSC
session
YSC cookie is set by Youtube and is used to track the views of embedded videos on Youtube pages.
yt-remote-connected-devices
never
YouTube sets this cookie to store the video preferences of the user using embedded YouTube video.
yt-remote-device-id
never
YouTube sets this cookie to store the video preferences of the user using embedded YouTube video.
yt.innertube::nextId
never
This cookie, set by YouTube, registers a unique ID to store data on what videos from YouTube the user has seen.
yt.innertube::requests
never
This cookie, set by YouTube, registers a unique ID to store data on what videos from YouTube the user has seen.