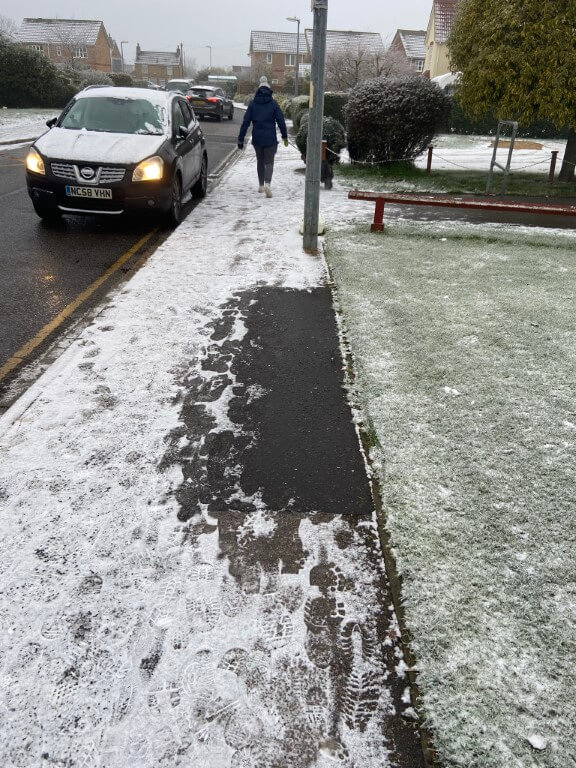
Overnight we had the first light dusting of snow and as normal we took the dog for his morning walk, when we got outside my house I noticed something odd had happened to the pavement.
Now it didn’t take a genius to work out that something is getting warm under the pavement and melting the snow, and it looks like, at some point in time, that the area had been dug up before for some reason.
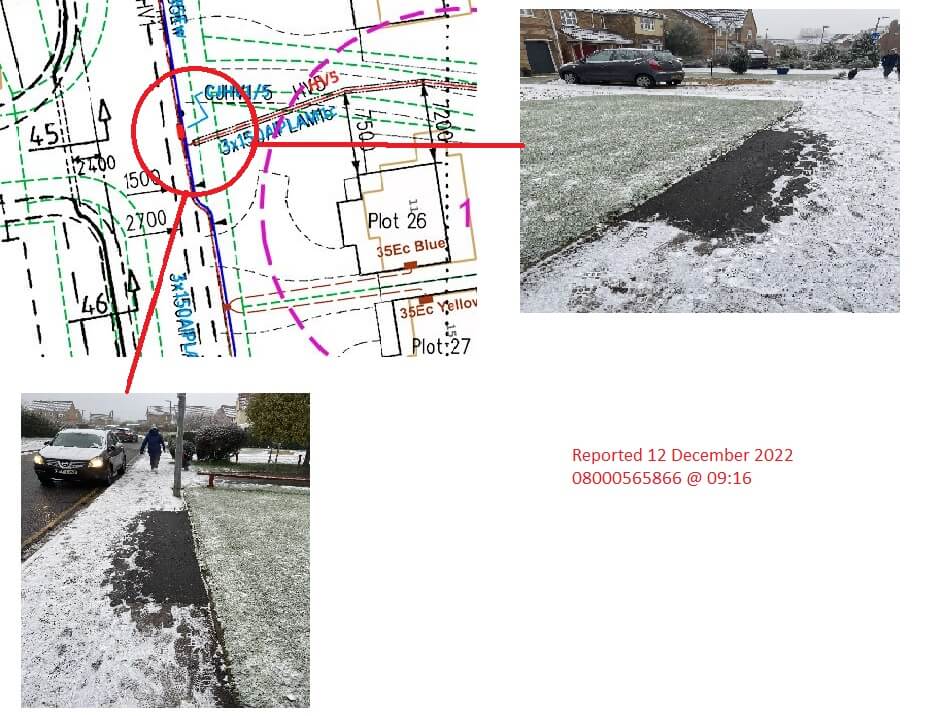
Having way too much time on my hands, I looked at electrical cable plans for my estate, and their it was, a significant cable joint:
Checking online, the network maintainer is UK Power Networks, telephone 0800 056 5866.
I gave them a quick call to let them know of the issue, the representative said they would send someone out to check it.
Why is it important to report this?
The simple answer is if the cable joint fails, it could be a catastrophic failure with the potential to cause harm or damage, or on a more basic level, result in a power outage until the joint is excavated and repaired.
Both can be avoided by early intervention, as an aside, I’ve noticed quite a few cable joints failing and my presumption is that this is due to the increase in Electric Vehicle charging and this will only be exacerbated by the colder weather as more and more heaters get switched on, (if we can afford it!!).
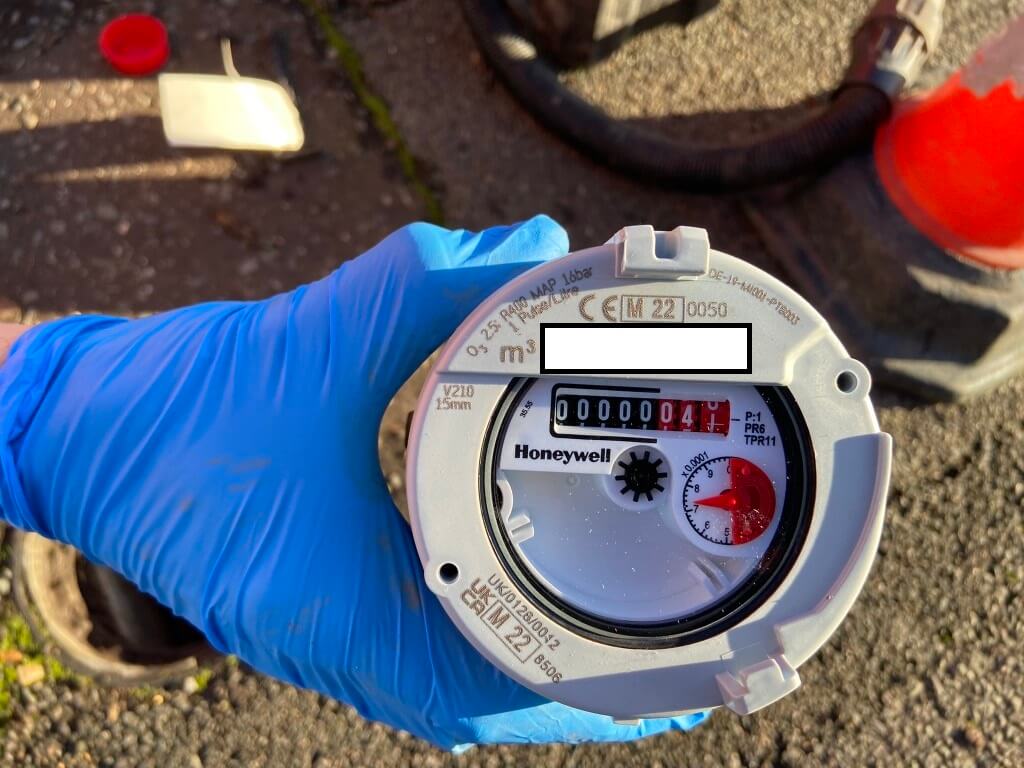
Every time I replace the salt blocks in my water softener, I note the reading on the water meter and log it, typically after 26 days I use between 8 to 9 m3 of water, however, when I checked on the 1st December, I had only used 1.6m3, so something was wrong with the meter in the street.
Two meter covers, the lower one is to my property.
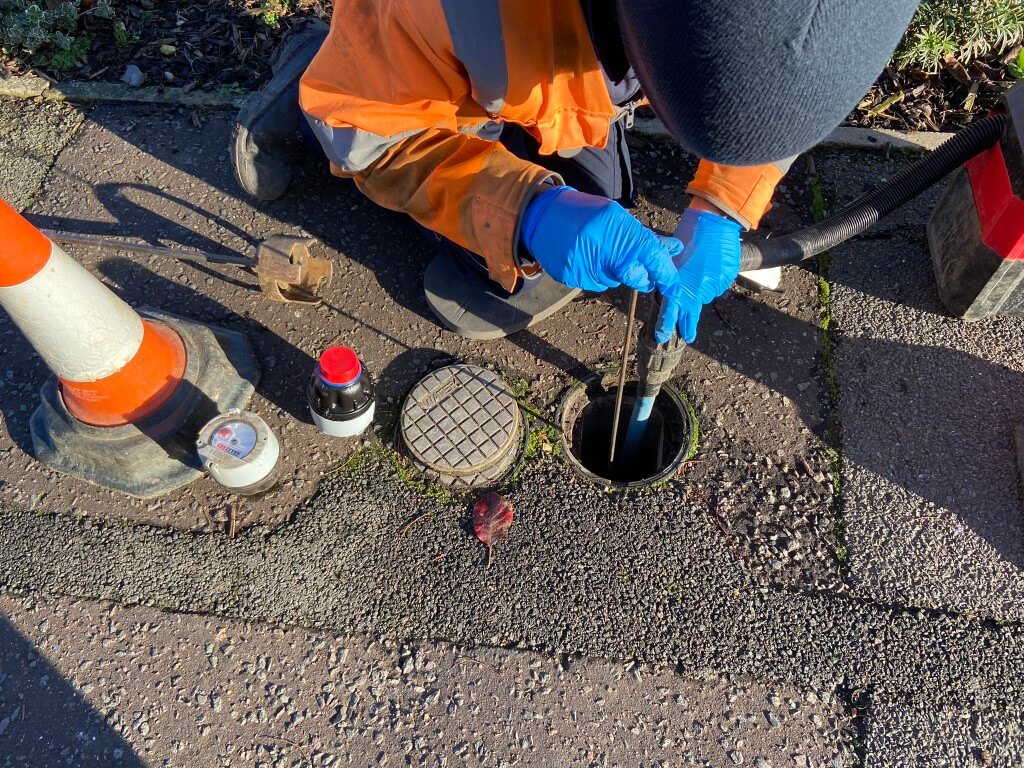
After reporting the low reading to Anglian Water on the 1st December, Jonathan the engineer called on the 7th December to replace the meter, I assumed that the meter would need to be dug up and replaced, but when I was told it will take 5 minutes, I thought I’d take a few pictures.
His first job was to insert a special key into the upstream isolating valve, and turned the water off feeding the meter, he then used the tool in the picture to slide over the meter body and simply unscrew it from the fixed base.
With the meter removed, he cracked open the isolating valve and using a wet vac, flushed out the meter body with fresh water incase their was any debris which could damage the new meter.
Once the flushing was complete, the new meter with the red protective thread cap removed was screwed into place and the water deisolated.
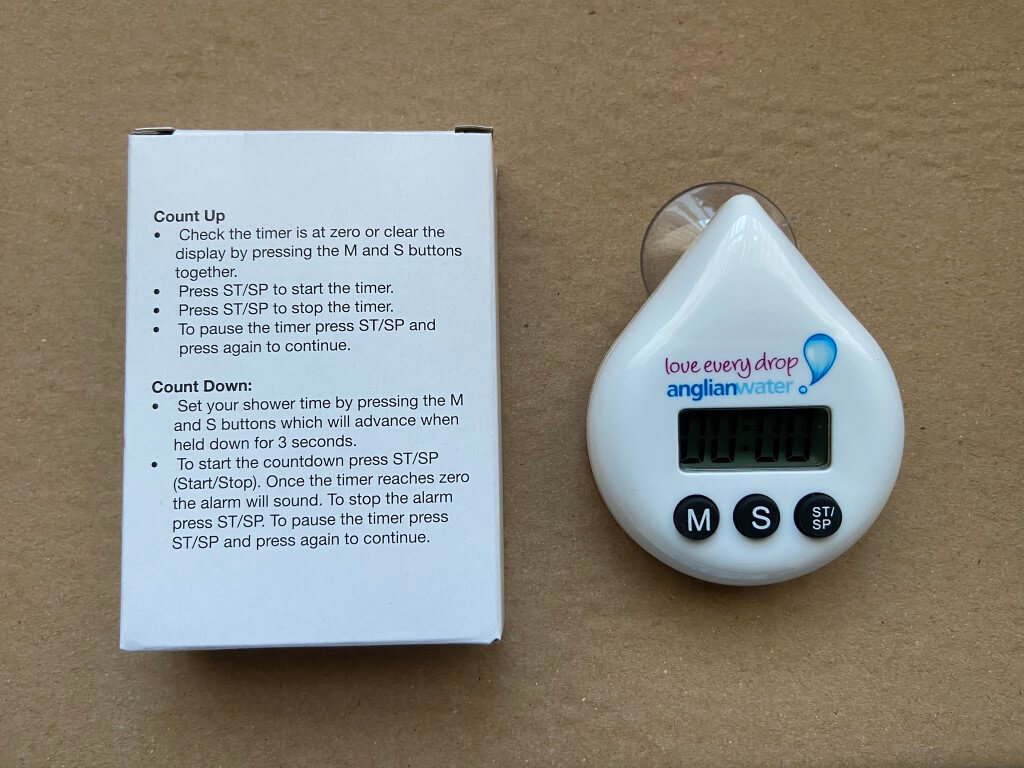
I was asked to test that the water was now working in the house, which it was, and he left after checking for meter leaks, but not before giving me a water saving pack which was much appreciated, especially the gadget to set your shower target duration in order to preserve water.
I have to note that with every interaction with Anglian Water, I have always found them to be professional and courteous.
My existing Vaillant central heating system boiler has been installed since 2003 and performs very well, however, when it is time to upgrade, I want to make sure the boiler and radiators have been correctly sized for a central heating design flow temperature of 550C (Δ t30), this flow temperature will be in compliance with Part L of the Building Regulations 2021.
For context, my existing system boiler is on a Honeywell ‘S’ plan, meaning I have two independently controlled motorised valves, one directs the boilers heated water to the radiators, whilst the other valve supplies the same temperature water to the unvented hot water cylinders indirect heating coil.
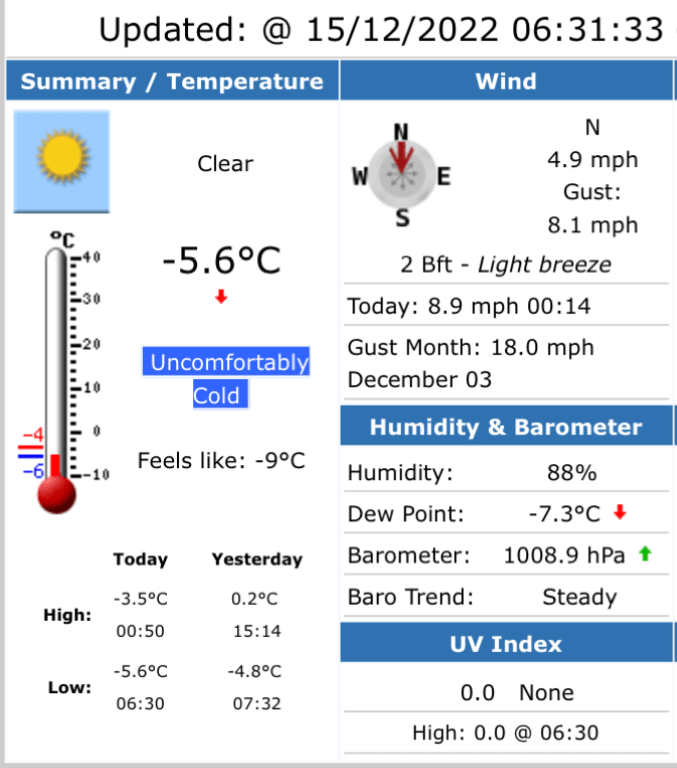
I have used recommended design temperatures for each room, this varies based on the function of the room and as I’m located in East Anglia, my CIBSE design outside temperature is -3oC.
Although the calculated heat loss minimum is -3c, as you can see, it does get colder.
So, my CIBSE Lounge design temperature is 21oC at an outside temperature of -3oC, therefore, my differential temperature is 24oC, meaning I can heat my room to 21oC, overcoming losses, even when its -3 oC outside.
Why Bother!
Good question.
Radiators are designed to give out a certain amount of heat (measured in Watts), when the water flow temperature in to the radiator is 75oC and the exit water temperature of the water from the radiator is 65oC, so 10oC has been dropped across the radiator.
For ease, lets say the water temperature across the radiator is in the middle of 75oC & 65oC making it 70oC, if the room is at 20oC, then 70oC – 20oC = 50oC, this is the Delta Temperature or Δ t50.
So what! Well at Δ t50 my bedroom radiator for example, gives out 1106 Watts, if my flow temperature is reduced to 55oC or Δ t30 then the same radiator will only give out 563 Watts of heat energy and as my bedroom needs 885 Watts to keep me warm, I won’t be a happy bunny.
The heat loss process proves if your existing radiators are adequate or not at reduced flow temperatures for each specific room in the house.
Heat Loss Process
Firstly I’m not a heat loss expert, this is an amateur blog on how I did mine as accurately* as I could, if you spot an error, please let me know as I’m always learning.
*Note- I have made a number of assumptions as I’m unsure of how the ground floor was constructed for example, however, I have used the 1991 version of Part L as my guide, as this was the current version when the house was constructed.
The key document for heating system design including calculation losses is the CIBSE, HVDH Domestic heating design guide (2021) which is downloadable for a fee (was £20).
The CIBSE guide includes recommended design temperatures based on the use of the room, for example a lounge temperature is 21oC also in the guide is common building materials and constructing type heat losses.
I also downloaded a free Heat Loss Excel Workbook from MCS and guidance on U-Values for the workbook are HERE.
The MCS Excel workbook requires detailed room, by room information to be gathered, including floor, ceiling and wall construction, I found the workbook to be excellent and well worth the effort of completing.
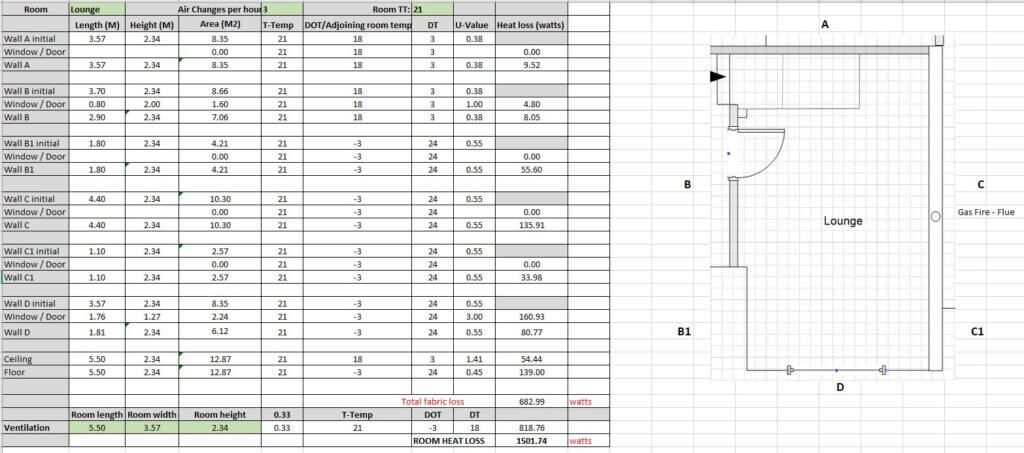
I decided to create my own spreadsheet so I can tailor it to take into account wall types changing on the same wall.
In the lounge for example wall ‘B’ separates the Hall and the wall is made from lightweight block, whilst wall ‘B1’ is an outside wall made from different materials with different thermal losses.
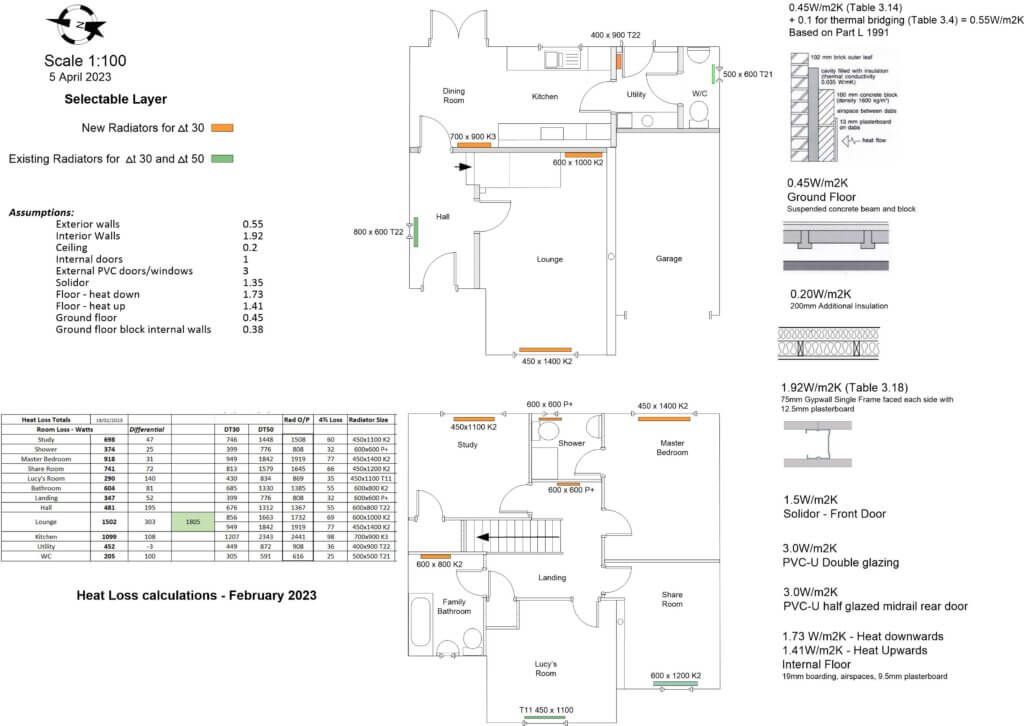
Using the spreadsheet, the lounge heat loss is calculated at 1502 Watts, this is quite high due to the gas fires flue increasing ventilation losses, however, my existing radiators give out 1973 Watts, so all is good.
With a new boiler at a flow temperature of 55oC, the outputs will be 997 Watts, not so good!
I did the same process for all the rooms using the drawing below.
Using Visio, I drew a scaled drawing and transferred all the measurements, this made the heat loss process easier as I could tick off the different materials and where they were used, ironically the MCS spreadsheet came out with very similar numbers to my spreadsheet, even though I drilled right down in to part-wall construction and factored heat gain/loss to adjacent rooms.
What was the outcome.
I learned that the total heat losses for my property is just under 6.8kW and I have a 24kW boiler which does not have the ability to modulate the gas valve, so when it fires up, I get 24kW of heat output whether I need it or not.
I do however need a minimum of 17.3kW to heat 170 litres of water in my unvented hot water cylinder, this means my new boiler will need an output of 18kW to heat my volume of water in 30 minutes.
Of the 13 radiators, I will need to increase in size 9 of them to compensate for the lower flow temperature, also I will need to factor a larger expansion vessel (12 litres), due to the increased heating system water volume as a result of the larger capacity radiators.
This exercise enabled me to have an informed boiler wish list:
System Boiler to have an output of 18kW,
Boiler to have Domestic Priority Hot Water,
Boiler to have an acceptable low kW gas modulation,
Boiler to modulate flow temperature on weather compensation.
Armed with this information, I can start to swop out existing radiators and make plumbing additions ready for a gas safe engineer to change to boiler, my pre-works will save him/her time and me money.
Update 5 April 2023
Required radiators have been updated, I chose Stelrad radiators as they are a well know and trusted brand, the only radiator which wasn’t Stelrad was for the Utility as they don’t do the size of 400 x 900 Type 22 (K2), so Kartell K.Rad was used.
I have always sharpened my lawn mower blade with a wet wheel grinding stone but the problem was getting an accurate cutting angle on the blade, looking around for a better solution, I came across the All American Sharpener which looked perfect.
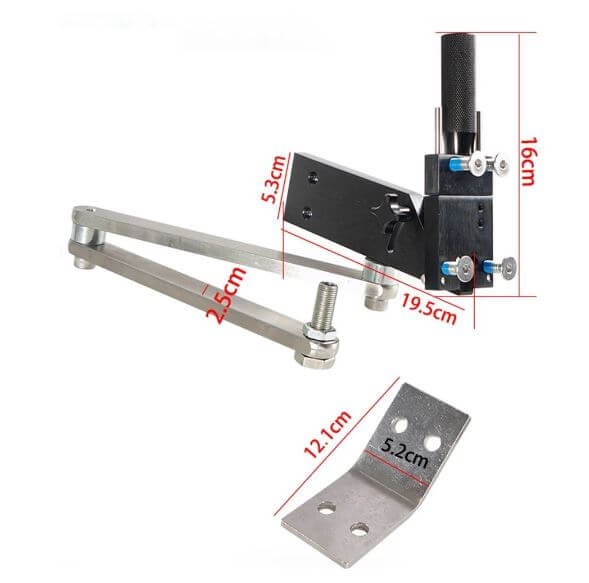
The appeal of this sharpener was the repeatability/accuracy of the blade grinding process and the fact that it makes use of an angle grinder that most DIYs already have.
The bad news is the cost, the current price on Amazon in the UK is £416.75 (2nd Nov 22) for a genuine All American Sharpener.
Being well outside my budget for an amateur, I went straight to eBay and for £56.97, bought a Model 5005 product which looked like it was based on the genuine version of the tool, however, its design was not simply not functional and I returned it for a refund.
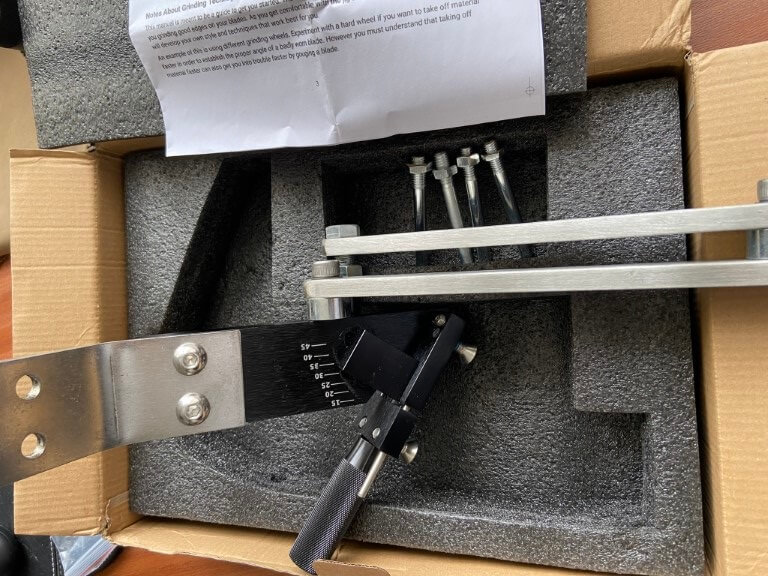
I ordered this on the 18th Oct 22 arriving 16 days later on the 2nd Nov 22 and I was immediately impressed with the quality of packaging and tool construction, the unit weighed in at 2.3kg.
The sharpener came with all the parts I expected, so very happy, the things not provided are the fixing bolts to secure the unit to a suitable surface, (in my case I’m using a vice), a 5.5mm Allen key to tighten the mounting bracket to the sharpener and an 8mm Allen key to relax the arm joints.
Flapper discs are recommended and the one I used was 80 grit which was bought from Aldi in an assorted pack for £4.99.
The sharpeners angle should be set to 300 for optimal cutting and due to the sharpeners design, the angle grinders cutting edge will now be perfectly aligned to allow the defined angle to be ground into the blade by simply moving the angle grinder up and down the blade which is the only movement the articulated arms allow.
Setup didn’t take long and after a few grinder passes, I had a nice sharp edges on the blade.
Once the blade was ground, I checked the blade for balance with a cheap and cheerful gadget, unfortunately the blade on my Titan Mower has an oval hole, this means getting the blade centered on the cone is difficult.
As the cone balancer was basically not really compatible with my blades oblong mounting hole, I bought from Amazon a Oregon blade balancer.
I have subsequently found out that it is not possible to get replacement blades for the Titan TTB833LWM 230v corded mower purchased from Screwfix, if I’d known this, I wouldn’t have bought the mower.
Conclusion
Obviously I would like to support the original developers of the blade sharpening product, but the UK price point makes this unaffordable to me, I therefore took a chance with the Chinese marketplace, Aliexpress.
It must be said that the quality of the sharpener is superb, all the attachments were included and I’m very impressed with the whole transaction, postage was more expensive than the tool itself, but nevertheless, I’m very happy with my purchase.
The Oregon blade balancer is a bit of self indulgence, the construction is solid and the rotation of the cone is very smooth, this will definitely last a lifetime
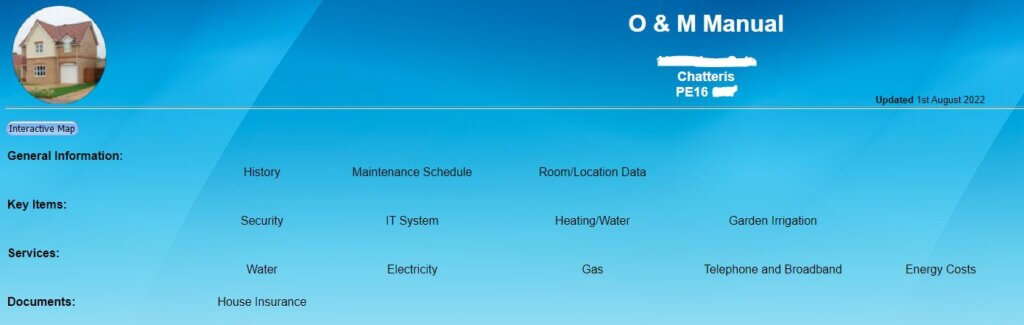
Now I have the time, I thought I would create what essentially is a home Operation and Maintenance, locally hosted webserved interactive manual.
The advantage of this is that all information relating to the house, individual rooms or equipment is held in one place, locally accessible on my home network either on my Desktop or mobile/ipad.
The starting block is my Synology Diskstation DS220+ Network Attached Storage (NAS) device;
The DS220+ has an inbuild webserver, so it was fairly easy to upload web pages created using the free version of Microsoft Expression Web 4, this is great software as it allows for the creation of image hotspot links to be embedded in pages.
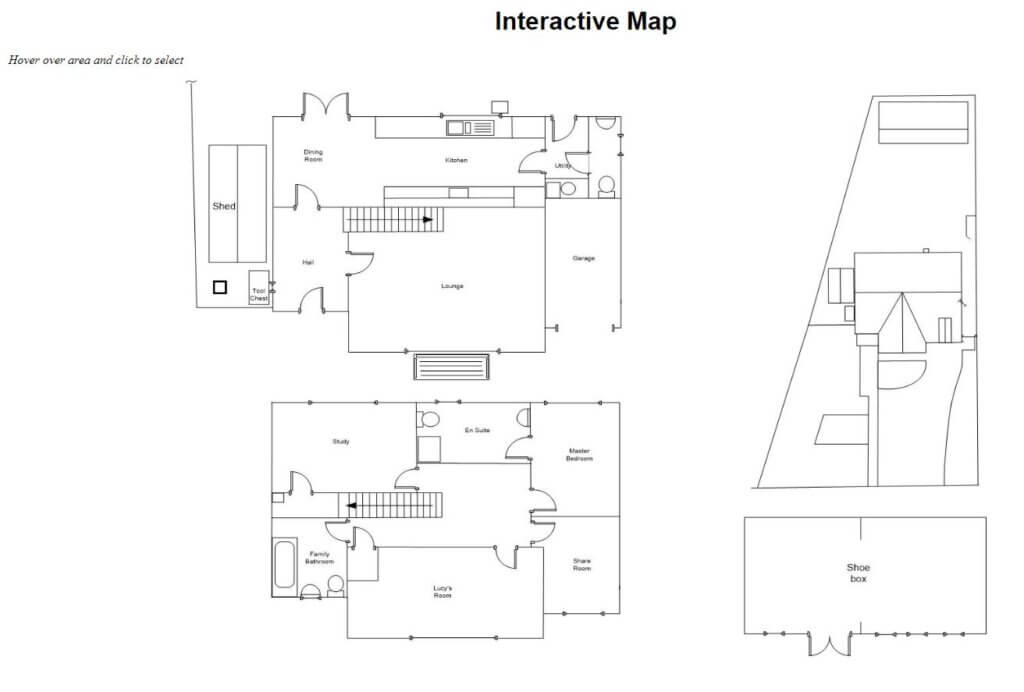
The main landing page is shown at the top of this blog, I can either click on the general description headings or click on the house image and an interactive view of the house will open:
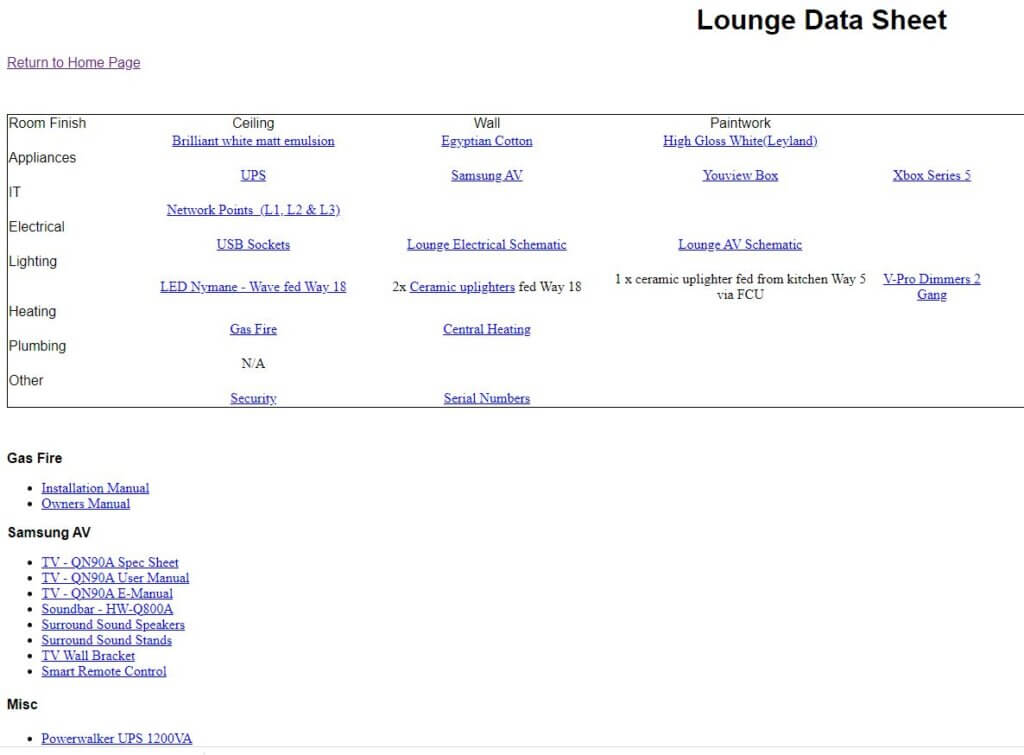
On the webserved image, as the mouse hovers over an area, this becomes ‘clickable’, on clicking, this takes you to the specific area of interest, as an example, hovering and clicking on the Lounge take me to:
This gives me access to room finishes, equipment manuals, serial number records and user guides, TV wiring, room electrical schematics and further links to specific, more detailed information of broader areas, such as the security system and central heating for example.
QR Code Labels
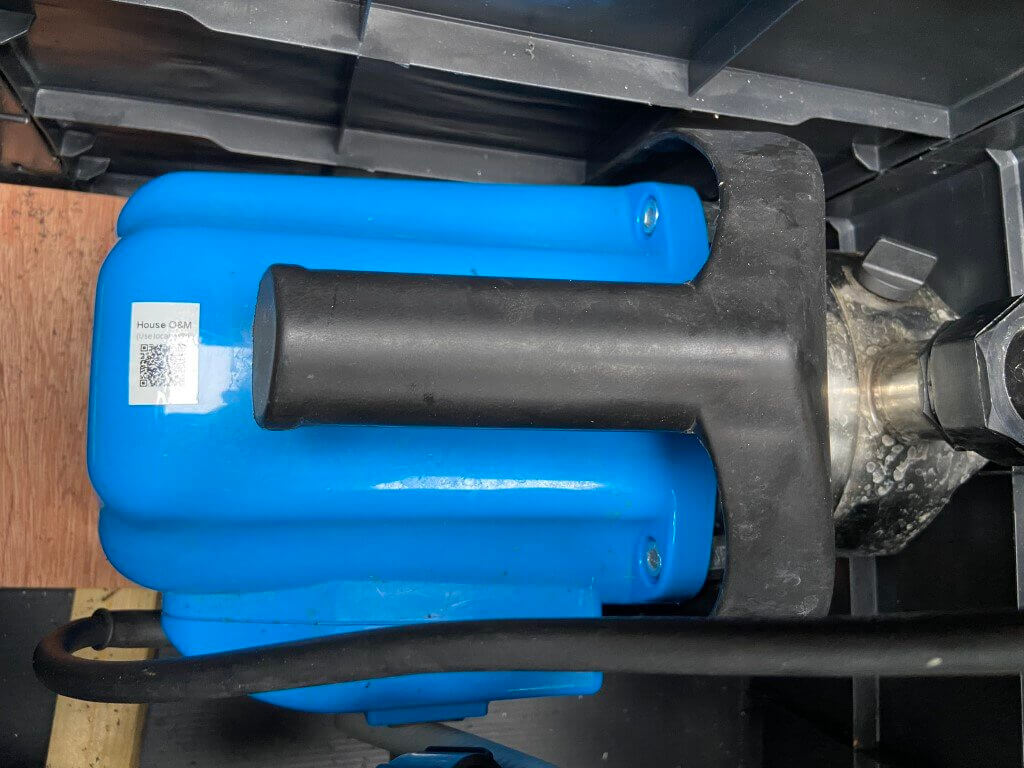
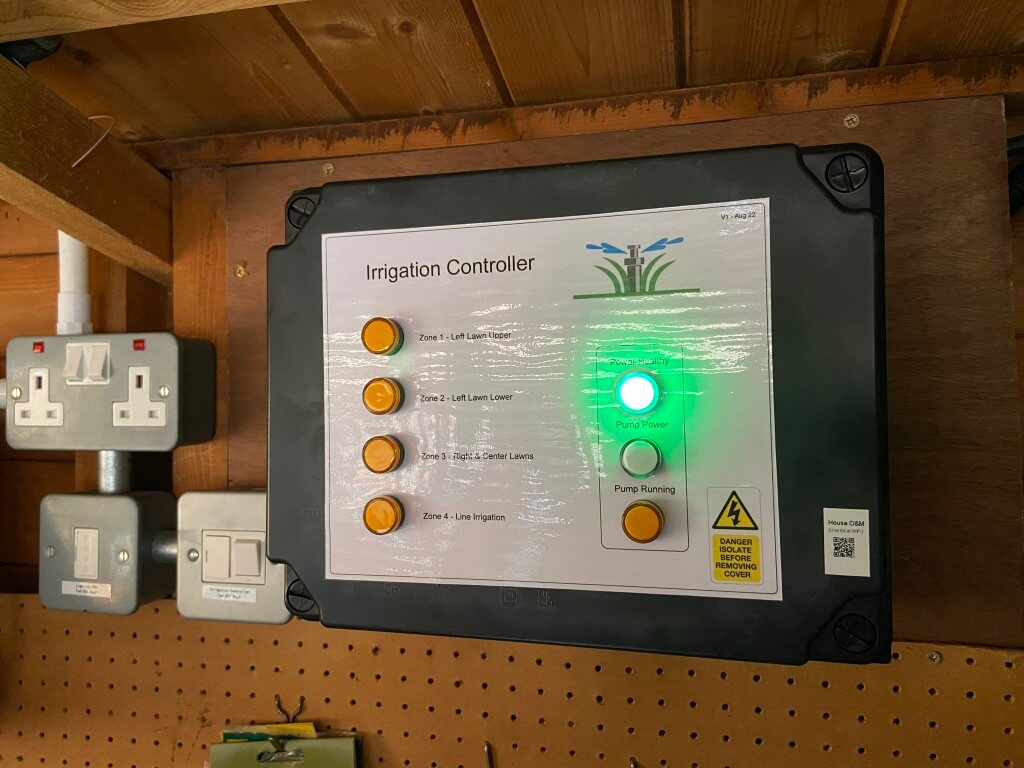
To enable quick access to information held on the webserver, I’ve used a number of QR code labels, to illustrate this, the pump for my irrigation system has a QR Code attached which will take you to the pumps manual:
Viewing the QR Code using a phone or ipad camera will automatically open the link to the webfile.
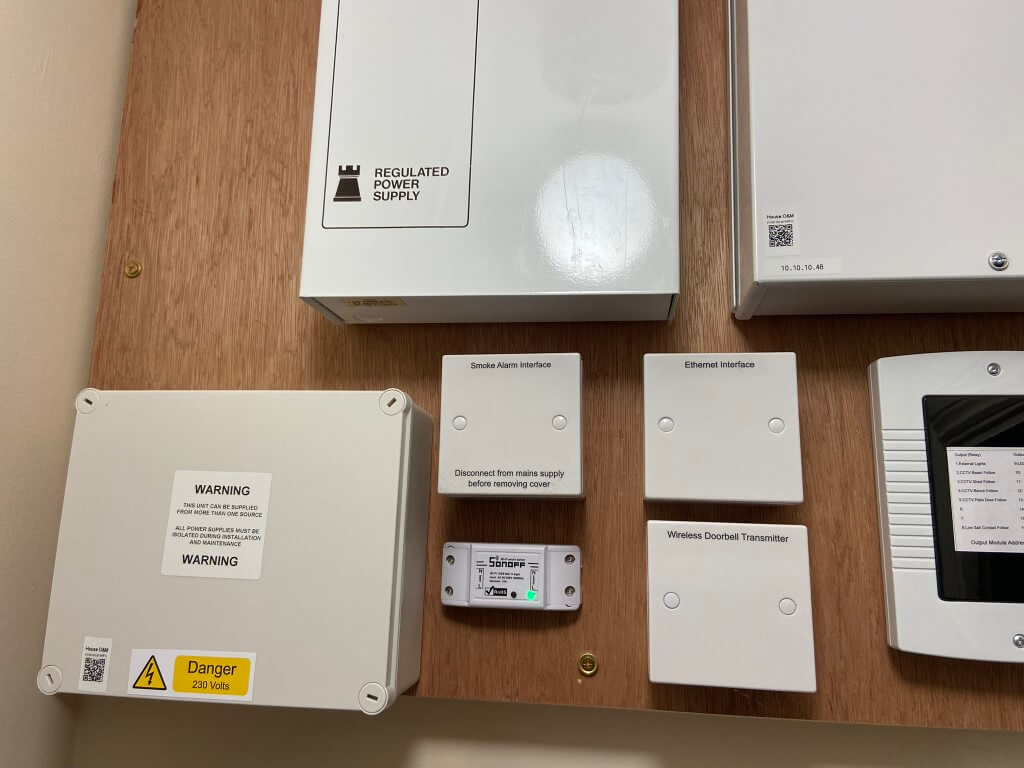
For more integrated projects, QR Codes are attached to the equipment linking to detailed, multi linked page/s:
Irrigation system is used in this example –
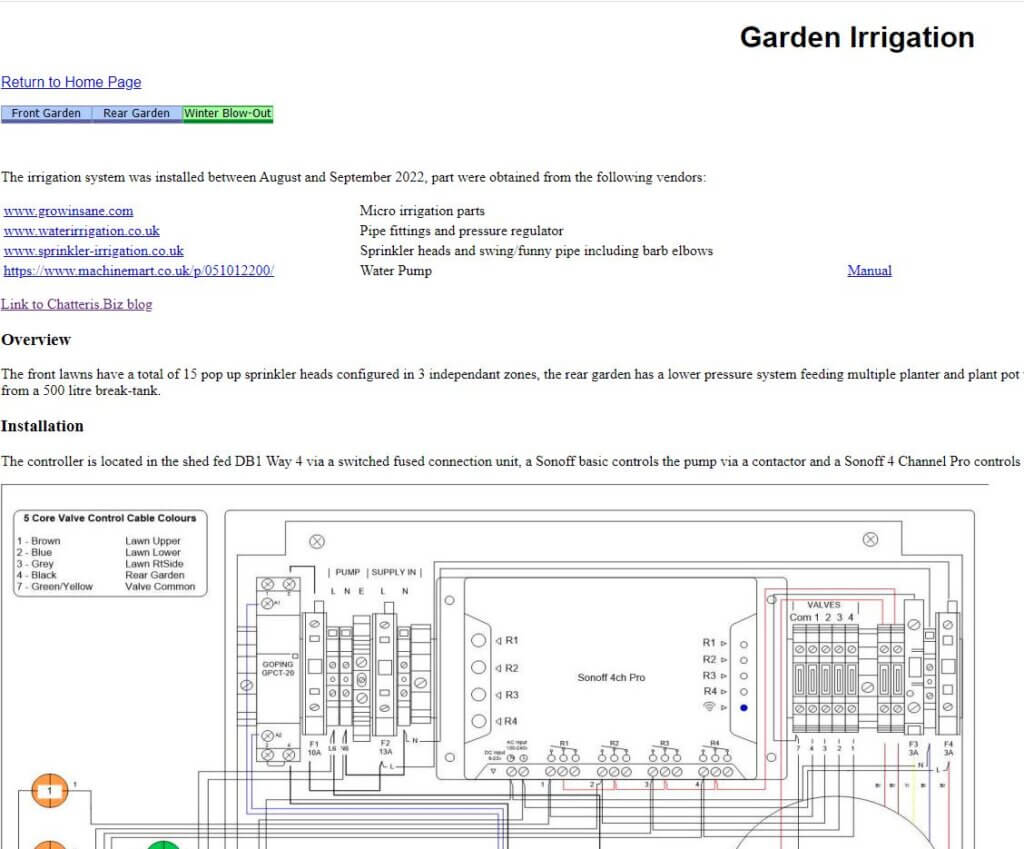
The controllers QR Code links directly to the Garden Irrigation page –
This linking to detailed information is incredibly useful to document on how things are configured, interconnected or interdependencies from a technical perspective, or more simply to store data sheets and supplier details.
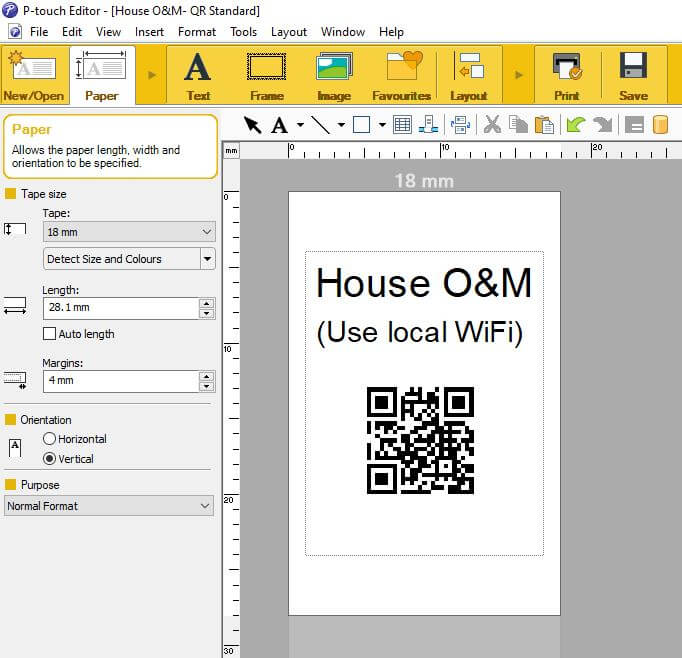
Producing QR Code Labels
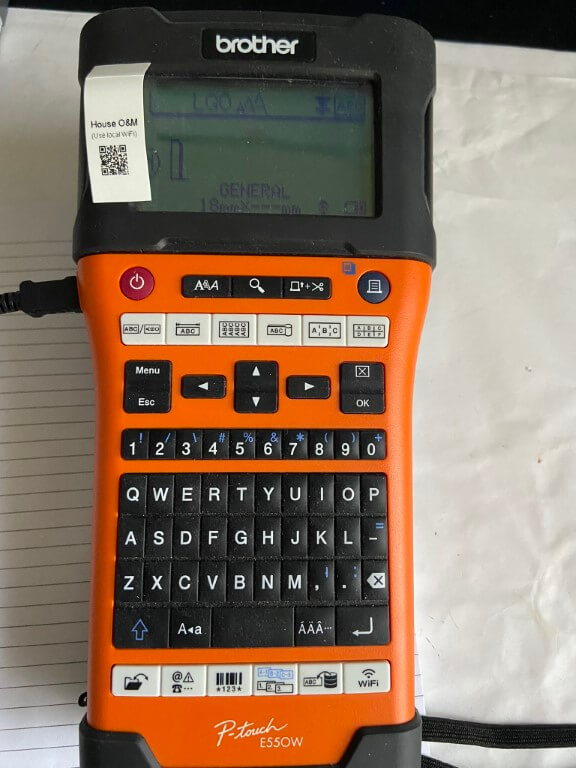
Small asset linking QR code labels are used:
The Brother P-Touch E550W printer has the ability to print a huge array of different labels, for asset labeling I use 18mm White Tape connecting the E550W printer to my PC using P-Touch free editing software.
The printer can connect via Wi-Fi or Direct USB cable to the software.
The above QR Code will take you to my other site, Chatteris Weather.
In P-Touch Editor software, select ‘Insert’ > ‘Bar Code’ with protocol ‘QR Code’ selected.
Within the QR Code software window, you simply paste the link in the ‘Input’ window and press save and print.
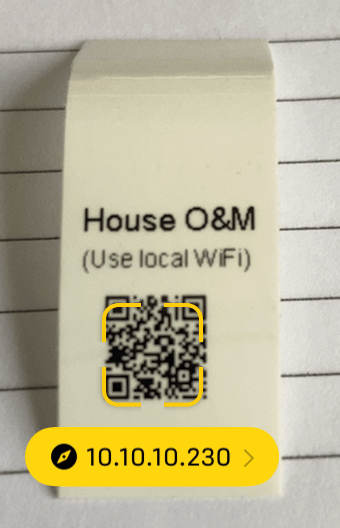
Viewing the QR code with a phone camera, a yellow box will appear with a partial link description, clicking in the yellow box will take you to the site originally entered in the ‘Input’ box.
Example display of correctly read QR Code
Conclusion – The use of a quick and easy way to access information makes life very easy, generating and maintaining the data does take time, but the information is available to anyone at anytime who needs it, (given they have the appropriate access rights to the Wi-Fi password).
Flurry of broadband activity in the town as Netomnia are installing their infrastructure just as Virgin Media are expanding their existing network. A blog on this is HERE.
Please Note – I’m not employed by Virgin Media and this Blog is based on my observations and assumptions, I have no insight into where, when or the extent of their program including properties to be ‘Openreach Duct’ ready.
Virgin Media – Phase 2 Infrastructure
In June 2017 Virgin Media contractors began the infrastructure works in Chatteris, digging over 37 miles of trenching to lay the microduct bundles which bring fibre optic cable to the home.
In late April 2022, I noticed that Kelly Communications on behalf of Virgin Media, were installing a number of BT marked footway boxes in front of existing street cabinets and this was due to the following :-
“In 2019 a Physical Infrastructure Access (PIA) statement was issued by OFCOM enabling other service providers (Alt-Nets), to use Openreach’s ducts and poles at a cost (Openreach Pricing)”
So this is the start of Virgin Media taking advantage of this arrangement in Chatteris enabling consumers to have a greater choice on service provision.
I’m assuming that as the cover had BT embossed in it, further civil works will be needed to duct to a nearby BT footway box.
While out and about in New Road, I noticed the new installation of a Nodal Cabinet, BT marked footway box and signs of interconnect works to a Openreach footway box by a Principle Connection Point which tweaked my interest :-).
I wondered why a Nodal Cabinet (right hand side) had been installed, then I remembered that a development of 52 dwellings in Lancaster Way were not included in the initial Project Lightning rollout and therefore did not have any ‘Toby’ boxes or microduct infrastructure installed.
The conventional way of getting a Virgin Media to your property is by a microduct (Virgin workers refer to these as ‘Straws’), from a Grey street cabinet directly to a ‘Toby’ box’, which will usually be on the pavement near the property boundary, once service is requested a fibre optic cable is blown down the microduct and terminated on the outside wall of your property.
With the duct sharing agreement in place, the lack of a ‘Toby’ does not necessarily now mean you can’t have Virgin Media installed, which is great news.
I’m not sure if Virgin Media are going to use telephone poles or stick to only using ducts at this time.
Due to the nodal cabinet in New Road, I had a look around Lancaster Way on the 4th May 2022 to see if any above ground infrastructure had been installed, and by pure chance Kelly Communications were installing a fibre to a property using Virgin Media assets within an Openreach footway box and they kindly allowed me to take a few pictures.
Emtelle OFDC – Click image for data sheet
It looks like a single microduct has been installed from the Virgin Media street cabinet in New Road (AF0409), using the Openreach ducts to cross two roads in getting to the footway box in the picture, a total distance of some 193 metres, (the advantages of Virgin Media sharing the ducts are obvious as the civils cost would have been considerable).
The fibre, via the microduct from Cabinet AF0409 is connected to an Outdoor Fibre Distribution Closure (OFDC) which is a ruggedised splice tray giving a 12 fibre outlet ports.
The OFDC is housed within an original Openreach footway box (Type 4), from when the estate was built, the OFDC uses a hinged, bespoke bracket, and shares the space with an Openreach Connectorised Block Terminal used for Ultra Fast Fibre Broadband by BT and other providers, (further details can be found in my blog on Future Fibre).
In the picture you can see a black with green strip microduct, this was installed by the Engineers and uses the same duct to the property as the telephone cable, the green microduct with a yellow label is ready to be joined together with a ‘push fit’ coupling.
The OFDC has the green microducts ‘tails’ already installed to make the process ‘standard’, mimicking a traditional, non shared duct installation.
Once the microduct was in the footway box and the connection made to the OFDC ‘tail’ , the fibre was blown from the property through the microduct and connected to the first port on the OFDC.
The ‘push fit’ coupling is a ‘Gas Block’ designed to prevent any dangerous gasses (if present), leaving the footway chamber via the microduct and causing a hazard.
John Guest Gas Block – click image for data sheet
The OFDC hinged lid was then clipped closed, the assembly then folded down and the manlid refitted, so their are no visible signs that Virgin Media is available in the area, unless you spot a physical Ominbox on the wall of a connected property.
Microduct emerging from the Openreach duct to the Omnibox.View showing the footway box fibre equipment.
The pen markings on the OFDC (AF040903) indicate that it feed originated from Cabinet AF04 and sub fed from cabinet number 09, I would presume the 03 represents that their are at least two other units OFDC’s in use here, and would expect a few more to provide estate coverage.
The picture above shows neighbours, one with a BT Customers Splice Point (CSP) for fibre, with this system the fibre connects to a Optical Network Termination (ONT) box inside the property, whereas the Virgin Media fibre terminates in the external Omnibox where an ‘optical to coaxial media converter’ is located, before the coaxial cable enters the property.
Joint Footway Type 4 ( 55cm x 100cm) containing the ODFC serving a property to the left of the picture.
Looking around Chatteris there are signs that Virgin Media are looking to try and include those properties which could not be traditionally served with a microduct service to the property, simply due to the distance from the boundary ‘Toby’ to the property.
Utilisation of existing Openreach ducts is the perfect solution, as per the example below:
The 4 ‘Toby’ boxes were installed in 2017 and the footway box was installed on the 6th May 2022 by Kelly Communications. The next stage will be to link the footway box to an Openreach footway box which contains the telephone ducts from the properties that the original ‘Toby’ boxes were provisioned for.
Once the Openreach footway box is located, an OFDC will be installed, ready for a customers connection should they place an order, if an order is forthcoming, the installation will progress as per the one in Lancaster Way.
It is difficult from this picture to show how far away the prospective Virgin Media consumers are, but you can see that if a ‘traditional’ microduct were to be installed directly from the ‘Toby’ to the property, it would involve a lot of Pave Block lifting and replacement (disruption and cost), not too mention gaining Wayleaves if required, so the use of existing Openreach infrastructure is ideal.
The distance from the ‘Toby’ to the furthest property is approximately 100m
This is another example of where 4 ‘Toby’ boxes have been installed ready to supply customers in 2017, but the block paved drive would make service provision costly, and this scenario is replicated multiple times in Chatteris, hence, the sharing of the existing telephone cable ducts will open Virgin Media to many more customers.
I’m not sure how Virgin Media will let you know you can have their service, probably a promotional leaflet through your letterbox or a knock on the door, but you can check availability HERE.
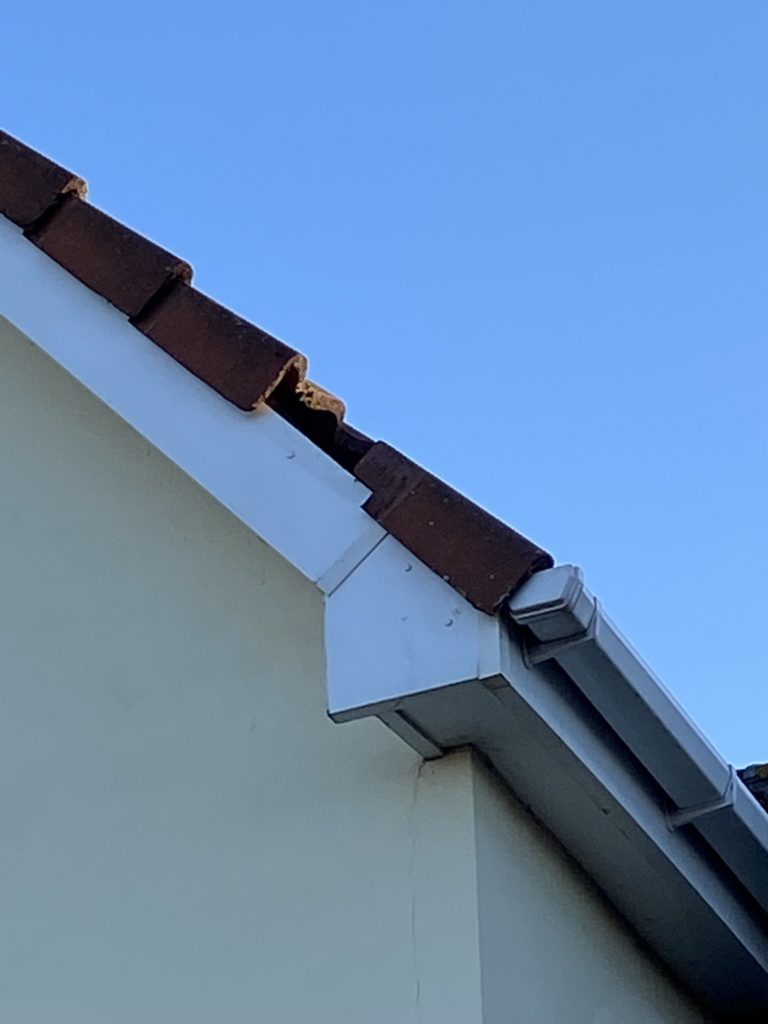
On the 18th February 2022, Storm Eunice arrived bringing disruption to many parts of the country and a record number of Red weather warnings being issued by the Met Office.
I recorded wind speeds of 52mph and this was enough to dislodge a roof tile which slide off the roof and smashed,
We are lucky in this town to have a distributor for the make of tiles I have, and they ordered a replacement for me.
The type and description of the tile I needed :
Sandtoft concrete double pantile right hand cloaked verge tile Rustic
The tile cost £11.50 and the roofer is due any day to fit it.
Update
15 March 22
I got let down by a roofer from Sommersham who promised they could do the job and in the end just didn’t bother coming or contacting me.
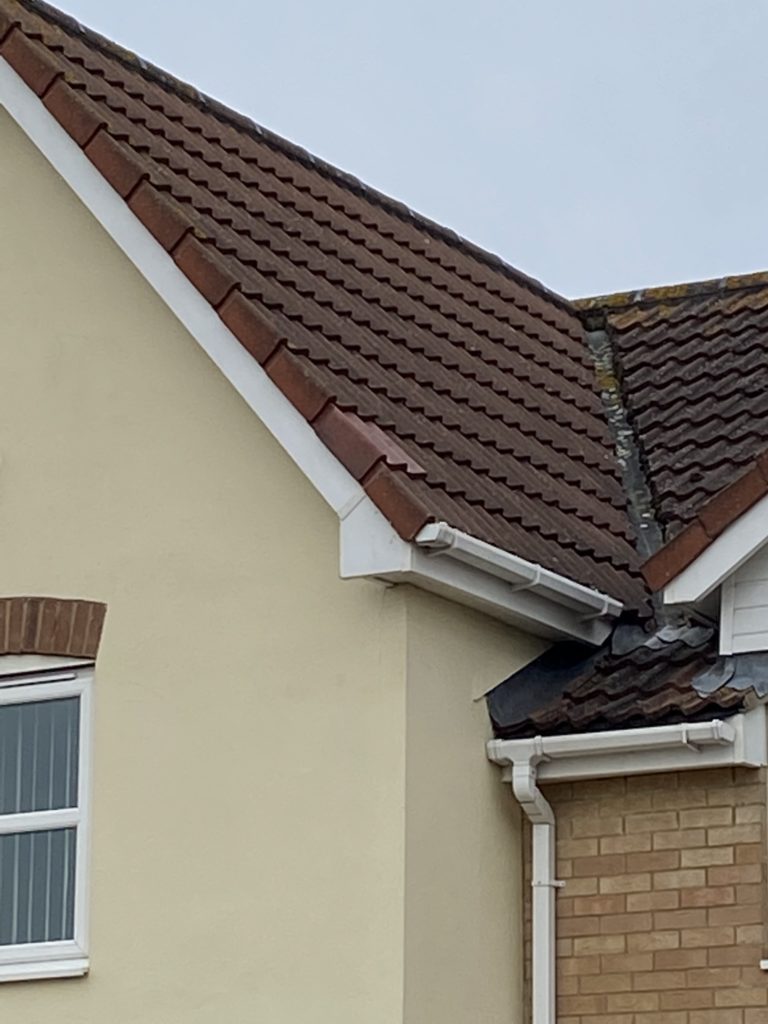
So I called the company I bought the tile from on the off chance they knew a roofer they could recommend, they gave me Matts number, and by 4pm on the same day, the new tile has been fitted.
While he was there I noticed a gap where the ridge tile meets the roof tiles, Matt said the plastic infill is missing so he nipped up and mortared this up, so we are watertight again 🙂
Matt did a great job and charged a very reasonable fee.
Very pleased with the job, the tile I lost was due to it not being secured with a nail, as nailing the replacement would mean removing all the preceding tiles as they overlap each other, so the workaround was to use an adhesive to bond the tile down.
This is a thing I’ve wanted to do for years, in 2016 eRice budget shared hosting service reseller simply went off line, leaving me and hundreds of others unable to gain access to our files and offline sites.
Fortunately, a user managed to get in touch with the data centre and a small window of time opened up where we could download our files, hence I ended up with GoDaddy as I knew of them!
GoDaddy have been a reliable host but the costs are rising, especially as Secure websites are the norm, meaning SSL certification is needed at a renewal price of £71.99 per year, excluding the actual cost of hosting and backup resilience, as a hobby site it was becoming unaffordable.
Any move of host is a daunting prospect as I’m not a scripter, but I bit the bullet and set up an account with Hostgator as they provide free SSL certification and their shared hosting package is quite competitive.
As with most web hosters, the longer the term entered into the lower the costs as does the use of discount coupons; the table below compares my hosts based on what I pay as of April 2022:
Per YearCosts
GoDaddy – 2 Year Term
Hostgator – 3 Year Term
Plan
Economy – £86.25
Baby – £38.47
SSL Certificate
£71.99
Included
Backup
10Gb @ £28.65
1Gb @ £21.93 5Gb @ £17.41
Domain Renewal
£23.89
N/A
Domain Privacy
£9.58
£11.41
Transfer
N/A
£5.39
Total
£220.36
£94.61
I will update this table when I know what the Hostgator Domain renewal costs are.
Migration
My first step was to transfer my domain name to HostGator, I did this as my GoDaddy SSL certificate was coming up for renewal and I didn’t want to pay for a renewal, so this was the trigger for the move.
My domain remained pointing to GoDaddys servers until I had transferred all my files, folders and databases.
Main details to note when setting up a database with a new host are:
Database Name (including any wording automatically inserted in front of it)
Database User
Database Password
I had the most trouble with WordPress, I did try a number of migration tools, but my site seemed too big for them to work and I missed the 30 day window for Hostgator to do a free migration, so I did it all using Filezilla, (links below).
I would be telling a fib if I said it went smoothly, it turned into a bit of a nightmare.
The two key issues were:
I copied the WordPress wpconfig.php file and changed the database details for the new host, but I missed the table prefix type setting, this should have been ‘wp’ but it contained a legacy prefix from GoDaddy
I host the WordPress files on my shared server, rather than use a managed host service provided by HostGator. It looked like both instances were working against each other, I called tech support and they disabled the WordPress managed service, and the blog then fired into life.
I also had a 1Tb USB drive to keep downloaded files on and as a transit drive which worked well.
The process was made easier as I had access to both hosts cPanels for creating database backups, filezilla did the main file transfer work as I’m more familiar with that than some of the cPanel features.
The migration was a good opportunity to weed out files and folders that have amassed after 6 years of change, now its over I feel a whole lot better, I have a better understanding of the process than I did before and the site loads a lot quicker than it did before, so I wouldn’t be so hesitant next time 🙂
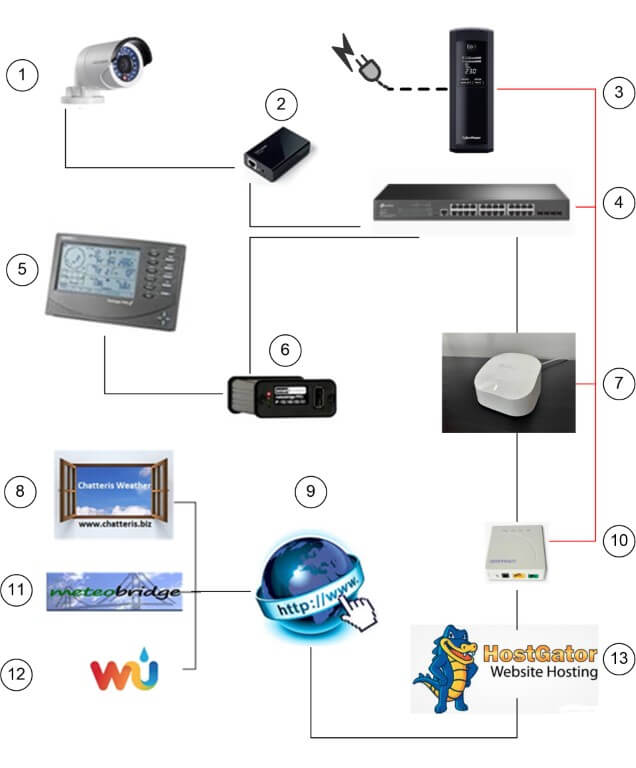
Chatteris Weather uses a high specification Davis Vantage Pro 2 wired weather station, various sensors are connected to the Integrated Sensor Suite, this in turn is connected to the Davis display console. Data is exported continuously from the display console by a data logger which uses a USB to connect to the Meteobridge Pro which was installed in mid December 2016.
The Meteobridge Pro replaced a PC which was running 24/7 in order to keep Weather Display software live and updating to the internet, the Weather Stations hourly power consumption dropped from 250 Watts to just 2 Watts and has paid for itself in energy costs.
The IP Hikvision webcam is powered over ethernet (POE) cable via a POE injection unit, Meteobridge Pro is configured to view the images generated by the webcam, every 5 minutes, the Meteobridge Pro updates my stations image on Weather Underground.
The Meteobridge Pro is also configured to send scheduled data to a wide range of weather site as well as Tweet weather conditions every half hour.
Chatteris Weather uses the Saratoga Template, the displayed Hikvision webcam images is linked back from Weather Underground.
The weather station and all downstream devices are powered via an uninterrupted power supply (UPS), this will run the station independently in the event of a power outage, for approximately 2 Hours before turning off.
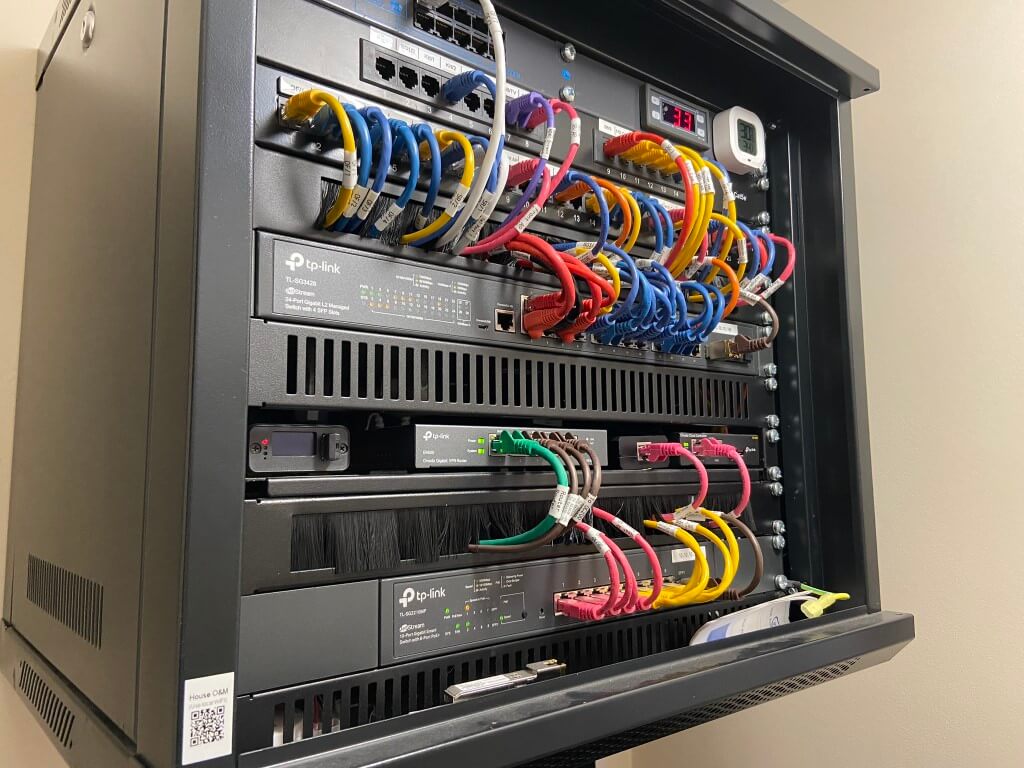
Meteobridge Pro is cabled to a TP network switch which is connected to a eero6 router. From January 2022, Fibre to the Premises (FTTP) was installed, (hence the Optical Network Termination), giving a download speed of 75Mbps and upload speed of 20Mbps.
Chatteris Weathers internet service provider is TalkTalk (managed by City Fibre).
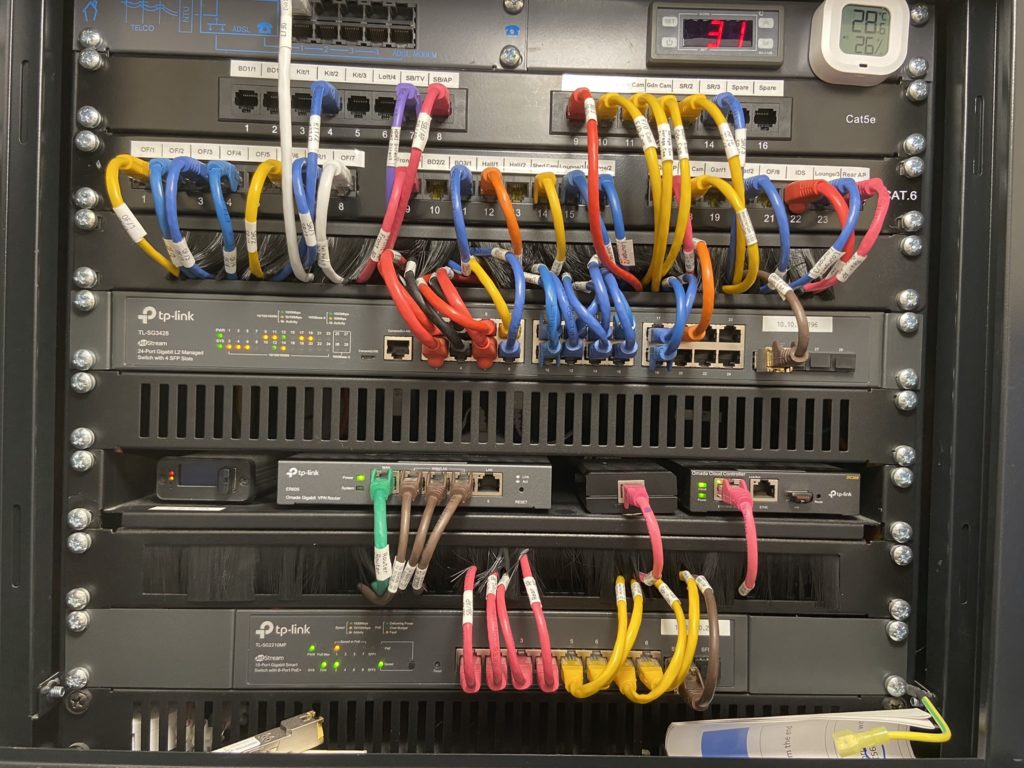
The above wall mounted rack is the central hub for my IT network and weather station hardware.
Project Lightning – Virgin Media Chatteris cabinet location map:
The Pin map shows the position of street cabinets, hovering over each pin will show its location and cabinet number, the see images of the cabinet, click the green circular cross below the map:
GREEN pins are completed VMSD1i Street Cabinets – either L3 or L4 (identifier stenciled on cabinet);
RED pins are not identified Street Cabinets;
PURPLE pins are Main Node locations (VMVH1);
BLUE pins are VMDD3I Double Cabinet;
BLACK pins are Outdoor Fibre Distribution Closure;
I would highly recommend a visit if you get a chance.
A blog about stuff that interests me or I have done.
We use cookies on our website to give you the most relevant experience by remembering your preferences and repeat visits. By clicking “Accept All”, you consent to the use of ALL the cookies. However, you may visit "Cookie Settings" to provide a controlled consent.
This website uses cookies to improve your experience while you navigate through the website. Out of these, the cookies that are categorized as necessary are stored on your browser as they are essential for the working of basic functionalities of the website. We also use third-party cookies that help us analyze and understand how you use this website. These cookies will be stored in your browser only with your consent. You also have the option to opt-out of these cookies. But opting out of some of these cookies may affect your browsing experience.
Necessary cookies are absolutely essential for the website to function properly. These cookies ensure basic functionalities and security features of the website, anonymously.
Cookie
Duration
Description
_GRECAPTCHA
5 months 27 days
This cookie is set by the Google recaptcha service to identify bots to protect the website against malicious spam attacks.
cookielawinfo-checkbox-advertisement
1 year
Set by the GDPR Cookie Consent plugin, this cookie is used to record the user consent for the cookies in the "Advertisement" category .
cookielawinfo-checkbox-analytics
11 months
This cookie is set by GDPR Cookie Consent plugin. The cookie is used to store the user consent for the cookies in the category "Analytics".
cookielawinfo-checkbox-functional
11 months
The cookie is set by GDPR cookie consent to record the user consent for the cookies in the category "Functional".
cookielawinfo-checkbox-necessary
11 months
This cookie is set by GDPR Cookie Consent plugin. The cookies is used to store the user consent for the cookies in the category "Necessary".
cookielawinfo-checkbox-others
11 months
This cookie is set by GDPR Cookie Consent plugin. The cookie is used to store the user consent for the cookies in the category "Other.
cookielawinfo-checkbox-performance
11 months
This cookie is set by GDPR Cookie Consent plugin. The cookie is used to store the user consent for the cookies in the category "Performance".
CookieLawInfoConsent
1 year
Records the default button state of the corresponding category & the status of CCPA. It works only in coordination with the primary cookie.
PHPSESSID
session
This cookie is native to PHP applications. The cookie is used to store and identify a users' unique session ID for the purpose of managing user session on the website. The cookie is a session cookies and is deleted when all the browser windows are closed.
viewed_cookie_policy
11 months
The cookie is set by the GDPR Cookie Consent plugin and is used to store whether or not user has consented to the use of cookies. It does not store any personal data.
Functional cookies help to perform certain functionalities like sharing the content of the website on social media platforms, collect feedbacks, and other third-party features.
Performance cookies are used to understand and analyze the key performance indexes of the website which helps in delivering a better user experience for the visitors.
Analytical cookies are used to understand how visitors interact with the website. These cookies help provide information on metrics the number of visitors, bounce rate, traffic source, etc.
Cookie
Duration
Description
_ga
2 years
The _ga cookie, installed by Google Analytics, calculates visitor, session and campaign data and also keeps track of site usage for the site's analytics report. The cookie stores information anonymously and assigns a randomly generated number to recognize unique visitors.
_ga_92TJCVGJP2
2 years
This cookie is installed by Google Analytics.
_gat_gtag_UA_48800884_1
1 minute
Set by Google to distinguish users.
_gid
1 day
Installed by Google Analytics, _gid cookie stores information on how visitors use a website, while also creating an analytics report of the website's performance. Some of the data that are collected include the number of visitors, their source, and the pages they visit anonymously.
CONSENT
2 years
YouTube sets this cookie via embedded youtube-videos and registers anonymous statistical data.
is_unique
5 years
StatCounter sets this cookie to determine whether a user is a first-time or a returning visitor and to estimate the accumulated unique visits per site.
is_visitor_unique
2 years
StatCounter sets this cookie to determine whether a user is a first-time or a returning visitor.
sc_is_visitor_unique
2 years
StatCounter sets this cookie to determine whether a user is a first-time or a returning visitor.
Advertisement cookies are used to provide visitors with relevant ads and marketing campaigns. These cookies track visitors across websites and collect information to provide customized ads.
Cookie
Duration
Description
NID
6 months
NID cookie, set by Google, is used for advertising purposes; to limit the number of times the user sees an ad, to mute unwanted ads, and to measure the effectiveness of ads.
VISITOR_INFO1_LIVE
past
A cookie set by YouTube to measure bandwidth that determines whether the user gets the new or old player interface.
YSC
session
YSC cookie is set by Youtube and is used to track the views of embedded videos on Youtube pages.
yt-remote-connected-devices
never
YouTube sets this cookie to store the video preferences of the user using embedded YouTube video.
yt-remote-device-id
never
YouTube sets this cookie to store the video preferences of the user using embedded YouTube video.
yt.innertube::nextId
never
This cookie, set by YouTube, registers a unique ID to store data on what videos from YouTube the user has seen.
yt.innertube::requests
never
This cookie, set by YouTube, registers a unique ID to store data on what videos from YouTube the user has seen.